ProForm 920ci English Manual - Page 6
ProForm 920ci Manual
 |
View all ProForm 920ci manuals
Add to My Manuals
Save this manual to your list of manuals |
Page 6 highlights
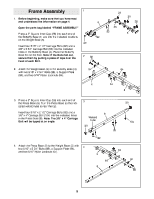
5. Place the bracket on the lower end of the Press Upright (2) over the indicated 5/16" x 2 1/2" Carriage Bolts (92) in the Press Base (6). Hand tighten two 5/16" Nylon Locknuts (64) onto the Bolts. Do not tighten the Nylon Locknuts yet. 5 2 64 92 6 6. Place the bracket on the lower end of the Butterfly Upright (1) over the indicated 5/16" x 2 1/2" Carriage Bolts (92) in the Butterfly Base (4). Hand tighten two 5/16" Nylon Locknuts (64) onto the Bolts. Do not tighten the Nylon Locknuts yet. 6 1 64 4 92 7. Place two Weight Bumpers (51) over the indicated holes in the Weight Base (5). Slide a Weight Guide (15) into each of the holes. Attach the indicated Weight Guide (15) to the Weight Base (5) with a 3/8" x 2 3/4" Bolt (46), two 3/8" Flat Washers (48), and a 3/8" Nylon Locknut (50). Slide six Weights (21) onto the Weight Guides (15). Make sure the Weights are turned so the pin grooves are on the bottom. Identify the Short Weight Tube (17), which has six holes in it. Press a Weight Tube Bumper (18) into the lower end of the Short Weight Tube. Slide the Weight Tube into the Weights (21). Slide a Top Weight (16) onto the Weight Guides (15). Make sure the Top Weight is turned so the groove fits over the pin on the Short Weight Tube (17). 7 16 Groove Pin 15 18 Pin Grooves 21 17 51 50 48 5 46 48 6
-
 1
1 -
 2
2 -
 3
3 -
 4
4 -
 5
5 -
 6
6 -
 7
7 -
 8
8 -
 9
9 -
 10
10 -
 11
11 -
 12
12 -
13
-
14
-
15
-
16
-
17
-
18
-
19
-
20
-
21
-
22
-
23
-
24
-
25
-
26
-
27
-
28
-
29
-
30
-
31
-
32
-
33
 |
 |
