ProForm Power 995 I Treadmill English Manual - Page 13
Remove and save the four 5/16 x 1/2, Screws 4. They will be used in the next step., Make sure
 |
View all ProForm Power 995 I Treadmill manuals
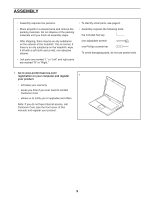
Add to My Manuals
Save this manual to your list of manuals |
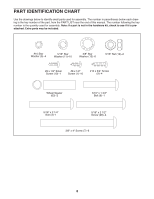
Page 13 highlights
8. If there are four screws (C) in the locations shown, remove and discard them. 8 C C 9. Set the console assembly face down on a soft surface to avoid scratching the console assembly. Remove and save the four 5/16" x 1/2" Screws (4). They will be used in the next step. 9 4 Console Assembly 4 10. Set the console assembly on the Left and Right Handrails (86, 87). Make sure not to pinch any 10 wires (D, 81). Attach the console assembly with the four 5/16" x 1/2" Screws (4) that you removed in step 9 and four 5/16" Star Washers (11). Do not tighten the Screws yet. Console Assembly D 86 87 11 81 11 4 4 13
-
 1
1 -
2
-
3
-
4
-
5
-
6
-
7
-
 8
8 -
 9
9 -
 10
10 -
 11
11 -
 12
12 -
 13
13 -
 14
14 -
 15
15 -
 16
16 -
 17
17 -
 18
18 -
19
-
20
-
21
-
22
-
23
-
24
-
25
-
26
-
27
-
28
-
29
-
30
-
31
-
32
-
33
-
34
-
35
-
36
-
37
-
38
-
39
-
40
 |
 |
13
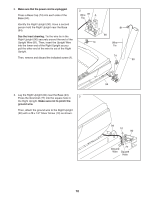
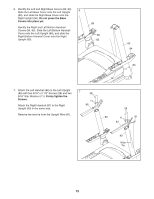
8.
If there are four screws (C) in the locations
shown, remove and discard them.
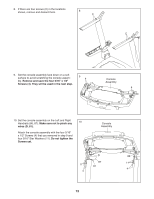
9.
Set the console assembly face down on a soft
surface to avoid scratching the console assem-
bly.
Remove and save the four 5/16" x 1/2"
Screws (4). They will be used in the next step.
8
9
C
4
C
4
Console
Assembly
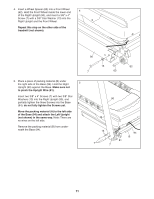
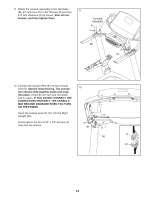
10.
Set the console assembly on the Left and Right
Handrails (86, 87).
Make sure not to pinch any
wires (D, 81).
Attach the console assembly with the four 5/16"
x 1/2" Screws (4) that you removed in step 9 and
four 5/16" Star Washers (11).
Do not tighten the
Screws yet.
10
Console
Assembly
87
86
4
11
4
11
81
D