RCA 25205RE1 User Guide - Page 13
Programming the Telephone - manual
 |
UPC - 044319502473
View all RCA 25205RE1 manuals
Add to My Manuals
Save this manual to your list of manuals |
Page 13 highlights
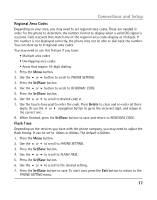
Connections and Setup Programming the Telephone Display Language You may set the display language to English, French, or Spanish. The default is English. 1. Press the Menu button. 2. Use the 5 or 6 button to scroll to DISPLAY SETTING. 3. Press the Sel/Save button. 4. Use the 5 or 6 button to scroll to LANGUAGE. 5. Press the Sel/Save button. 6. Use the 5 or 6 button to select the language. 7. When finished, press the Sel/Save button to save. To start over, press the button to return to the DISPLAY SETTING menu and repeat step 4. Manually Setting the Date and Time NOTE: If you do not manually set the time and date, it is automatically set when you receive your first Caller ID call. The unit resets the hour and minute each time a call is received. 1. Press the Menu button. 2. Use the 5 or 6 button to scroll to DISPLAY SETTING. 3. Press the Sel/Save button. 4. Use the 5 or 6 button to scroll to TIME & DATE. 5. Press the Sel/Save button. 6. Use the 5 or 6 button to scroll to the desired Month. 7. Press the Sel/Save button to save. The cursor moves to the Date field. 8. Use the 5 or 6 button to select the Date. 9. Press the Sel/Save button to save. The cursor moves to the Hour field. 10. Use the 5 or 6 button to select the Hour and AM/PM. 11. Press the Sel/Save button to save. The cursor moves to the Minute field. 12. Use the 5 or 6 button to select the Minute. 13. Press the Sel/Save button to save. The cursor moves to the Day field. 14. Use the 5 or 6 button to select the Day (from Monday to Sunday). 15. Press the Sel/Save button to save. To start over, press the Exit button to return to the DISPLAY SETTING menu and repeat step 4. 13
-
 1
1 -
2
-
3
-
4
-
5
-
6
-
7
-
 8
8 -
 9
9 -
 10
10 -
 11
11 -
 12
12 -
 13
13 -
 14
14 -
 15
15 -
 16
16 -
 17
17 -
 18
18 -
19
-
20
-
21
-
22
-
23
-
24
-
25
-
26
-
27
-
28
-
29
-
30
-
31
-
32
-
33
-
34
-
35
-
36
-
37
-
38
-
39
-
40
-
41
-
42
-
43
-
44
-
45
-
46
-
47
-
48
-
49
-
50
-
51
-
52
-
53
-
54
-
55
-
56
-
57
-
58
-
59
-
60
-
61
-
62
-
63
-
64
-
65
-
66
-
67
-
68
-
69
-
70
-
71
-
72
-
73
-
74
-
75
-
76
-
77
-
78
-
79
-
80
-
81
-
82
-
83
-
84
-
85
-
86
-
87
-
88
-
89
-
90
-
91
-
92
-
93
-
94
-
95
-
96
 |
 |