RCA L32HD41 User Guide & Warranty - Page 25
Using, the TV Menu
 |
UPC - 846042701594
View all RCA L32HD41 manuals
Add to My Manuals
Save this manual to your list of manuals |
Page 25 highlights
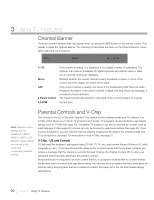
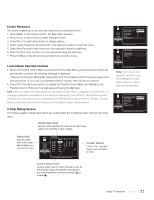
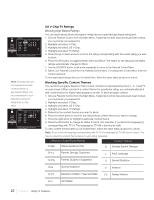
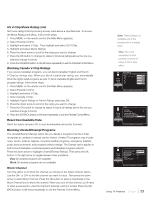
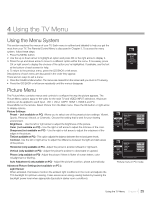
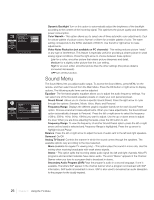
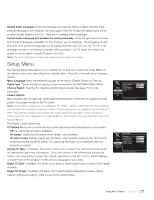
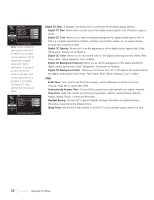
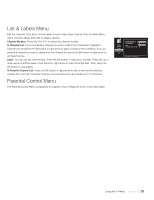
4 Using the TV Menu Using the Menu System This section explores the menus of your TV. Each menu is outlined and detailed to help you get the most from your TV. The Parental Control Menu is discussed in Chapter 3. To access the menu system, follow these steps: 1. Press the MENU button. 2. Use the up or down arrow to highlight an option and press OK or the right arrow to display it. 3. Press the up and down arrow to move to a different option within the menu. If necessary, press OK or right arrow to display the choices of the option you've highlighted. If available, use the text at the bottom of each screen for help. 4. To return to the previous menu, press the GO BACK or left arrow. Descriptions of each menu are discussed in the order they appear. There are two ways to exit a menu: • Press the CLEAR or Menu button. The menus are cleared from the screen and you return to TV viewing. • Press the GO BACK or left arrow repeatedly until the menus disappear. Picture Menu The Picture Menu contains menus and controls to configure the way the picture appears. The Picture Menu options apply to the video for the main TV and VIDEO INPUT selections. All picture options can be applied to each input - VID 1, VID 2, CMPT, HDMI 1, HDMI 2 and PC. Press MENU on the remote. Select Picture from the Main menu. Press the OK button or right arrow to display options. Picture Settings: Preset - (not available on PC) Allows you to select one of the preset picture settings: Vibrant, Sports, Personal, Natural, or Cinematic. Choose the setting that is best for your viewing environment. Brightness - Use the left or right arrow to adjust the brightness of the picture. Color (not available on PC) - Use the right or left arrow to adjust the richness of the color. Sharpness (not available on PC) - Use the right or left arrow to adjust the crispness of the edges in the picture. Tint (not available on PC) - This option adjusts the balance between the red and green levels. Contrast -Use the left or right arrow to adjust the difference between the light and dark areas of the picture. Horizontal ( only available on PC) - Adjust the picture's position leftward or rightward. Vertical ( only available on PC) - Adjust the picture's position to downward or upward. Phase ( only available on PC)- Adjust the picture if there is flicker of screen letters, color misalignment or blurring. Auto Adjustment ( only available on PC) - Adjust the picture's position, phase automatically. Advanced Picture Settings (not available on PC ) : Light Sensor When activated, this feature monitors the ambient light conditions in the room and adjusts the TV's backlight for optimum viewing. It also serves as an energy-saving feature by lowering the backlight power level when appropriate (typically in darker room conditions). Picture Sound Setup List & Labels Parental Control Exit Picture Sound Setup List & Labels Parental Control Exit Picture Preset Brightness Color Sharpness Tint Contrast Advanced Settings Personal 50 50 4 0 80 Press > or OK to change this setting. Picture Sound Setup List & Labels Parental Control Exit Brightness Contrast Horizontal Vertical Phase Auto Adjustment 50 50 0 0 80 Start Press > or OK to change this setting. Picture menu in PC mode Using the TV Menu Chapter 4 25
-
 1
1 -
2
-
3
-
4
-
5
-
6
-
7
-
8
-
9
-
10
-
11
-
12
-
13
-
14
-
15
-
16
-
17
-
18
-
19
-
 20
20 -
 21
21 -
 22
22 -
 23
23 -
 24
24 -
 25
25 -
 26
26 -
 27
27 -
 28
28 -
 29
29 -
 30
30 -
31
-
32
-
33
-
34
-
35
-
36
-
37
-
38
-
39
-
40
 |
 |