Reebok 8100 Es Treadmill English Manual
Reebok 8100 Es Treadmill Manual
 |
View all Reebok 8100 Es Treadmill manuals
Add to My Manuals
Save this manual to your list of manuals |
Reebok 8100 Es Treadmill manual content summary:
- Reebok 8100 Es Treadmill | English Manual - Page 1
questions, or if parts are damaged or manual) before contacting Customer Care. CALL TOLL-FREE: 1-877-994-4999 Mon.-Fri. 6 a.m.-6 p.m. MT Sat. 8 a.m.-4 p.m. MT ON THE WEB: www.reebokservice.com CAUTION Read all precautions and instructions in this manual before using this equipment. Save this manual - Reebok 8100 Es Treadmill | English Manual - Page 2
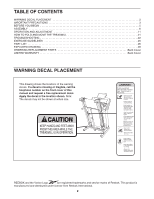
YOU BEGIN 5 ASSEMBLY 6 OPERATION AND ADJUSTMENT 11 HOW TO FOLD AND MOVE THE TREADMILL 21 TROUBLESHOOTING 22 EXERCISE GUIDELINES 25 PART LIST 26 EXPLODED DRAWING 28 ORDERING REPLACEMENT PARTS Back Cover LIMITED WARRANTY Back Cover WARNING DECAL PLACEMENT This drawing shows the locations of - Reebok 8100 Es Treadmill | English Manual - Page 3
, see your local REEBOK dealer or call the telephone number on the front cover of this manual and order part number 146148, or see your local electronics store. 13. Failure to use a properly functioning surge suppressor could result in damage to the control system of the treadmill. If the control - Reebok 8100 Es Treadmill | English Manual - Page 4
remove the motor hood un- less instructed to do so by an authorized ser- vice representative. Servicing other than the procedures in this manual should be performed by an authorized service representative only. 26. This treadmill is intended for in-home use only. Do not use this treadmill in - Reebok 8100 Es Treadmill | English Manual - Page 5
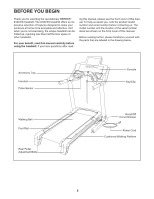
BEGIN Thank you for selecting the revolutionary REEBOK® 8100 ES treadmill. The 8100 ES treadmill offers an impressive selection of features designed to make your workouts at home more enjoyable and effective. And when youʼre not exercising, the unique treadmill can be folded up, requiring less than - Reebok 8100 Es Treadmill | English Manual - Page 6
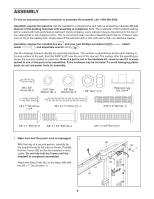
authorized service technician to assemble the treadmill, call 1-800-445-2480. Assembly requires two persons. Set the treadmill in a cleared area and remove all packing materials. Do not dispose of the packing materials until assembly is completed. Note: The underside of the treadmill walking belt - Reebok 8100 Es Treadmill | English Manual - Page 7
2. Insert an Extension Leg (97) into the Base (85) as shown; if necessary, use a rubber mallet to fully insert the Extension Leg. Next, hold two Extension Leg Nuts (10) in the bottom of the Extension Leg, and tighten two 5/ - Reebok 8100 Es Treadmill | English Manual - Page 8
Do not fully fold the Frame until the treadmill is completely assembled. 81 Attach two Base Pads (81) to the Base (85) with 1 two #8 x 1" Tek Screws (1). 1 81 55 6. Insert an Extension Leg (97) into the Base (85) as shown; if necessary, use a rubber mallet to 6 fully insert the Extension - Reebok 8100 Es Treadmill | English Manual - Page 9
not to overtighten the Screws. With the help of a second person, carefully tip the treadmill down so that the Base (85) is flat on the floor. 8 82 85 6 111 7 9. With the help of a second person, hold the console assembly near the Left Upright (111) and 9 the Right Upright (113). Connect the - Reebok 8100 Es Treadmill | English Manual - Page 10
replaceable. If these parts become dislodged from the Console Base (98), simply press them back in. 10 105 8 98 4 8 114 Console Assembly 11. all parts are properly tightened before you use the treadmill. Keep the included hex key in a secure place; the hex key is used to adjust the walking belt - Reebok 8100 Es Treadmill | English Manual - Page 11
decrease the possibility of your treadmill being damaged, always use a surge suppressor with your treadmill (see drawing 1 at the right). To purchase a surge suppressor, see your local REEBOK dealer or call the telephone number on the front cover of this manual and order part number 146148, or see - Reebok 8100 Es Treadmill | English Manual - Page 12
. To prevent damage to the walking platform, always wear clean shoes while using the treadmill. The first time the treadmill is used, observe the alignment of the walking belt, and center the walking belt if necessary (see page 24). Note: The console can display speed and distance in either miles or - Reebok 8100 Es Treadmill | English Manual - Page 13
workout has been selected, press the Manual Control button. IMPORTANT: The console features a display demo mode, designed to be used if the treadmill is displayed in a store. If As you exercise, change the speed of the walking belt as desired by pressing the Speed increase and decrease buttons - Reebok 8100 Es Treadmill | English Manual - Page 14
treadmill to reach the selected incline setting. 5. Follow your progress with the matrix and the displays. The matrix-When the manual per mile whenever the speed of the walking belt changes. The Distance display- This display will rate when you use the handgrip pulse sensor (see step 6 on - Reebok 8100 Es Treadmill | English Manual - Page 15
This display will show the speed of the walking belt. avoid moving your hands. When your pulse is detected the treadmill to the storage position, or you may damage the treadmill. Next, remove the key from the console and put it in a secure place. When you are finished using the treadmill, switch - Reebok 8100 Es Treadmill | English Manual - Page 16
TO USE A CLASSIC WORKOUT 1. Insert the key into the console. in the display and the last segment ends. The walking belt will then slow to a stop. If the speed or manually override the setting by pressing the speed or incline buttons. Note: When the next segment of the workout begins, the treadmill - Reebok 8100 Es Treadmill | English Manual - Page 17
USE A WEIGHT LOSS WORKOUT 1. Insert the key into the console manually override the setting by pressing the Speed and Incline buttons. Note: When the current segment of the workout ends, the treadmill walking belt will begin to move at 1 mph. When the next segment of the workout begins, the treadmill - Reebok 8100 Es Treadmill | English Manual - Page 18
into the console. See three columns of indicators appear, see HOW TO USE A CUSTOM WORKOUT on page 19. 3. Press the moment after you press the button, the walking belt will begin to move. Hold the handrails and ply adjust the speed and incline of the treadmill as desired by pressing the Speed and - Reebok 8100 Es Treadmill | English Manual - Page 19
HOW TO USE A CUSTOM WORKOUT 1. Insert the key into the console. See HOW TO TURN ON THE POWER on page 13 increase button. After a moment, the walking belt will begin to move at 1 mph. When the next segment of the workout begins, the treadmill will automatically adjust to the speed and incline - Reebok 8100 Es Treadmill | English Manual - Page 20
THE INFORMATION MODE The console features an information mode that keeps track of the total number of hours that the treadmill has been used and the total number of miles that the walking belt has moved. The information mode also allows you to select miles or kilometers as the unit of measurement - Reebok 8100 Es Treadmill | English Manual - Page 21
an uneven surface. 3. Place one foot against one of the wheels, and carefully lower the treadmill until it is resting in the storage position. Wheel HOW TO LOWER THE TREADMILL FOR USE 1. Hold the upper end of the treadmill with your right hand. Pull the latch knob to the left and hold it. It - Reebok 8100 Es Treadmill | English Manual - Page 22
, wait for five minutes, and then plug it back in. c. Remove the key from the console. Reinsert the key into the console. d. If the treadmill still will not run, see the front cover of this manual. PROBLEM: The displays of the console do not function properly SOLUTION: a. Remove the key from the - Reebok 8100 Es Treadmill | English Manual - Page 23
using a slotted screwdriver. Next, 17 18 reattach the Motor Hood (not shown), making sure that 1/8 in. the #8 x 3/4" Screws (not shown) are in the same holes from which they were removed. Then, run the treadmill for a few minutes to check for a correct speed reading. PROBLEM: The console - Reebok 8100 Es Treadmill | English Manual - Page 24
Plug in the power cord, insert the key, and run the treadmill for a few minutes. Repeat until the walking belt is centered. b. If the walking belt slips when walked on, first remove the key and UNPLUG THE POWER CORD. Using the b hex key, turn both rear roller bolts clockwise, 1/4 of a turn. When - Reebok 8100 Es Treadmill | English Manual - Page 25
over the age of 35 or persons with pre-existing health problems. The pulse sensor is not a medical device. Various factors intensity is the key to achieving results. You can use your heart rate as a guide to find the proper intensity level. The chart below enjoyable part of your everyday life. 25 - Reebok 8100 Es Treadmill | English Manual - Page 26
the parts listed below, see the EXPLODED DRAWING near the end of this manual. Belt Guide 1/2" Belt Guide Screw 3/8" x 1 1/2" Bolt Walking Platform Walking Belt Front Roller/Pulley Magnet Frame Spacer Front Isolator Reed Switch Clip Reed Switch #8 x 1/2" Screw Cable Tie Drive Motor Motor Belt Console - Reebok 8100 Es Treadmill | English Manual - Page 27
Console Bumper Platform Cushion 8" Blue Wire, M/F 8" Green Wire, F/Ring 4" Red Wire, M/F 4" Black Wire, M/F 8" White Wire, M/F User's Manual Note: Specifications are subject to change without notice. For information about ordering replacement parts, see the back cover of this manual. *These parts - Reebok 8100 Es Treadmill | English Manual - Page 28
EXPLODED DRAWING A-Model No. RBTL79607.1 R0709A 28 63 63 123 77 99 63 93 63 14 99 79 125 12 13 16 106 15 54 100 63 63 123 19 18 17 63 61 62 102 60 57 27 29 39 49 77 99 64 60 62 102 39 28 61 57 11 27 55 32 108 3 63 79 23 56 14 12 13 11 99 125 92 3 76 - Reebok 8100 Es Treadmill | English Manual - Page 29
EXPLODED DRAWING B-Model No. RBTL79607.1 6 34 33 26 25 6 34 R0709A 11 69 74 75 6 34 66 59 22 58 68 110 21 109 31 122 37 36 23 94 11 53 107 38 96 48 23 42 65 40 11 37 19 41 87 43 24 71 71 87 71 51 52 23 6 50 104 35 45 71 47 71 71 44 29 - Reebok 8100 Es Treadmill | English Manual - Page 30
EXPLODED DRAWING C-Model No. RBTL79607.1 R0709A 8 4 73 48 111 113 84 82 5 88 89 88 9 6 6 2 6 81 1 97 10 30 80 8 4 81 5 1 73 85 80 2 9 8 7 7 11 91 81 1 97 11 88 5 89 88 10 6 6 81 1 7 84 91 81 83 1 30 8 5 81 1 4 30 - Reebok 8100 Es Treadmill | English Manual - Page 31
EXPLODED DRAWING D-Model No. RBTL79607.1 R0709A 6 67 99 6 99 99 6 105 95 6 6 99 99 6 99 72 86 114 103 99 98 101 6 99 6 99 6 99 121 112 6 6 6 24 6 70 115 90 46 6 116 90 90 78 117 116 115 124 115 120 90 118 124 119 78 31 - Reebok 8100 Es Treadmill | English Manual - Page 32
this manual) • the key number and description of the replacement part(s) (see the PART LIST and the EXPLODED DRAWING near the end of this manual) and material, under normal use and service conditions. The frame and drive motor are warranted for a lifetime. Parts and labor are warranted for
-
 1
1 -
 2
2 -
 3
3 -
 4
4 -
 5
5 -
 6
6 -
 7
7 -
8
-
9
-
10
-
11
-
12
-
13
-
14
-
15
-
16
-
17
-
18
-
19
-
20
-
21
-
22
-
23
-
24
-
25
-
26
-
27
-
28
-
29
-
30
-
31
-
32
 |
 |
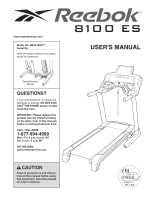
USER'S MANUAL
CAUTION
Read all precautions and instruc-
tions in this manual before using
this equipment. Save this manual
for future reference.
Serial Number
Decal
Model No. RBTL79607.1
Serial No.
Write the serial number in the space
above for reference.
QUESTIONS?
If you have questions, or if parts are
damaged or missing,
DO NOT CON-
TACT THE STORE; please contact
Customer Care.
IMPORTANT: Please register this
product (see the limited warranty
on the back cover of this manual)
before contacting Customer Care.
CALL TOLL-FREE:
1-877-994-4999
Mon.–Fri. 6 a.m.–6 p.m. MT
Sat. 8 a.m.–4 p.m. MT
ON THE WEB:
www.reebokservice.com
www.reebokfitness.com