Reebok Rl 1500 Elliptical User Manual - Page 7
Slide an M8 Small Washer 18 and an Axle Cap
 |
View all Reebok Rl 1500 Elliptical manuals
Add to My Manuals
Save this manual to your list of manuals |
Page 7 highlights
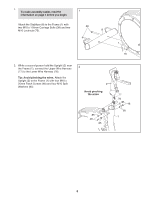
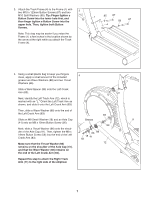
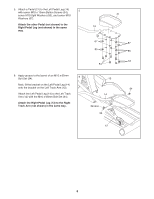
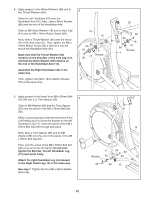
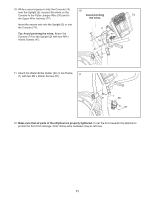
3. Attach the Track Frame (4) to the Frame (1) with two M10 x 123mm Button Screws (87) and two 3 M10 Split Washers (85). Tip: Finger tighten a Button Screw into the lower hole first, and then finger tighten a Button Screw into the upper hole. Then, tighten both Button Screws. Note: This step may be easier if you raise the Frame (1) a few inches in the location shown by the arrow at the right while you attach the Track Frame (4). 1 85 87 85 87 4 4. Using a small plastic bag to keep your fingers clean, apply a small amount of the included 4 grease two Wave Washers (88) and two Thrust Washers (66). Slide a Weld Spacer (89) onto the Left Crank Arm (83). Next, identify the Left Track Arm (12), which is marked with an "L." Orient the Left Track Arm as shown, and slide it onto the Left Crank Arm (83). Then, slide a Wave Washer (88) onto the end of the Left Crank Arm (83). 83 Slide an M8 Small Washer (18) and an Axle Cap Grease 11 (41) onto an M8 x 19mm Button Screw (56). 89 Next, slide a Thrust Washer (66) onto the shoulder of the Axle Cap (41). Then, tighten the M8 x 19mm Button Screw (56) into the end of the Left Crank Arm (83). 66 88 18 41 56 Make sure that the Thrust Washer (66) 12 remains on the shoulder of the Axle Cap (41), and that the Wave Washer (88) remains on the end of the Left Crank Arm (83). Repeat this step to attach the Right Track Arm (11) to the right side of the elliptical. 7
-
 1
1 -
 2
2 -
 3
3 -
 4
4 -
 5
5 -
 6
6 -
 7
7 -
 8
8 -
 9
9 -
 10
10 -
 11
11 -
 12
12 -
13
-
14
-
15
-
16
-
17
-
18
-
19
-
20
-
21
-
22
-
23
-
24
-
25
-
26
-
27
-
28
 |
 |
