Ricoh C220N Operating Instructions - Page 92
Other Printing Problems
 |
UPC - 026649060052
View all Ricoh C220N manuals
Add to My Manuals
Save this manual to your list of manuals |
Page 92 highlights
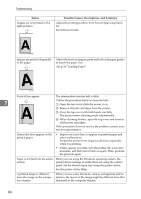
Troubleshooting Other Printing Problems Status Possible Causes, Descriptions, and Solutions Toner smears appear on the print side of the page. The paper setting may not be correct. For example, although you are using thick paper, the setting for thick paper may not be set. • Check the printer driver's paper settings. See the printer driver Help. Confirm that the paper is not curled or bent. Envelopes can be curled easily. Flatten paper before loading. See p.23 "Paper and Other Media". Paper jams occur frequently. • Number of paper set in the tray exceeds the limit. Confirm that the top of the stack is not higher than the limit mark inside the tray. See p.34 "Loading Paper". • There may be a gap between the front end paper guide and the paper, or between the paper guide both side and the paper in the paper tray. Make sure there are no gaps. See p.34 "Loading Paper". • Paper is either too thick or too thin. See p.23 "Paper and Other Media". • Paper is bent or wrinkled. Use paper that has no bents or 7 wrinkles. See p.23 "Paper and Other Media". • Paper has already been printed on. See p.23 "Paper and Other Media". • Paper is damp. Use paper that has been stored properly. See p.23 "Paper and Other Media". • The friction pad, or paper feed roller or registration roller might be dirty. Clean the relevant component. See p.66 "Cleaning the Friction Pad and the Paper Feed Roller", and p.69 "Cleaning the Registration Roller". Prints fall behind the machine when they are output. Raise the appropriate stop fence (forward fence for A4, rear fence for legal size prints). See p.1 "Exterior: Front View". Prints do not stack properly. • Paper is damp. Use paper that has been stored properly. See p.23 "Paper and Other Media". • Pull out the extender. • Log on to Smart Organizing Monitor as an Administrator, and then select [Mode 2] or [Mode 3] in the [Anti-humidity:] list on the [System] tab. Note that the first print takes longer than subsequent prints to complete. • Raise the appropriate stop fence (forward fence for A4, rear fence for legal size prints). See p.1 "Exterior: Front View". 82
-
 1
1 -
2
-
3
-
4
-
5
-
6
-
7
-
8
-
9
-
10
-
11
-
12
-
13
-
14
-
15
-
16
-
17
-
18
-
19
-
20
-
21
-
22
-
23
-
24
-
25
-
26
-
27
-
28
-
29
-
30
-
31
-
32
-
33
-
34
-
35
-
36
-
37
-
38
-
39
-
40
-
41
-
42
-
43
-
44
-
45
-
46
-
47
-
48
-
49
-
50
-
51
-
52
-
53
-
54
-
55
-
56
-
57
-
58
-
59
-
60
-
61
-
62
-
63
-
64
-
65
-
66
-
67
-
68
-
69
-
70
-
71
-
72
-
73
-
74
-
75
-
76
-
77
-
78
-
79
-
80
-
81
-
82
-
83
-
84
-
85
-
86
-
 87
87 -
 88
88 -
 89
89 -
 90
90 -
 91
91 -
 92
92 -
 93
93 -
 94
94 -
 95
95 -
 96
96 -
 97
97 -
98
-
99
-
100
-
101
-
102
-
103
-
104
-
105
-
106
-
107
-
108
-
109
-
110
-
111
-
112
-
113
-
114
-
115
-
116
-
117
-
118
-
119
-
120
-
121
-
122
 |
 |
