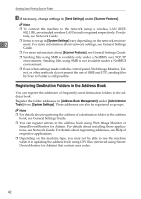
Ricoh MP161SPF Operating Instructions - Page 50
Scan to Folder icon, Destination field, E-mail, work Delivery Scanner, Dest., Options, Add Dest
 |
View all Ricoh MP161SPF manuals
Add to My Manuals
Save this manual to your list of manuals |
Page 50 highlights
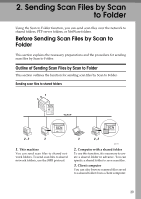
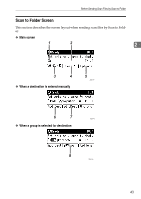
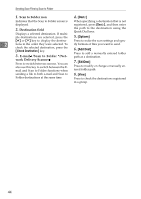
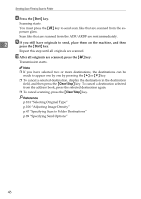
Sending Scan Files by Scan to Folder 1. Scan to Folder icon 4. [Dest.:] Indicates that the Scan to Folder screen is When specifying a destination that is not displayed. registered, press [Dest.:], and then enter 2. Destination field Displays a selected destination. If multiple destinations are selected, press the the path to the destination using the Quick Dial keys. 5. [Options] {U} or {T} key to display the destina- Press to make the scan settings and spec- 2 tions in the order they were selected. To ify formats of files you want to send. check the selected destination, press the {Check Destination} key. 6. [Add Dest] Press to add a manually entered folder 3. E-mail /Scan to Folder /Net- path as a destination. work Delivery Scanner Press to switch between screens. You can also use this key to switch between the Email and Scan to Folder functions when 7. [EditDest] Press to modify or change a manually entered folder path. sending a file to both e-mail and Scan to Folder destinations at the same time. 8. [View] Press to check the destinations registered in a group. 44
-
 1
1 -
2
-
3
-
4
-
5
-
6
-
7
-
8
-
9
-
10
-
11
-
12
-
13
-
14
-
15
-
16
-
17
-
18
-
19
-
20
-
21
-
22
-
23
-
24
-
25
-
26
-
27
-
28
-
29
-
30
-
31
-
32
-
33
-
34
-
35
-
36
-
37
-
38
-
39
-
40
-
41
-
42
-
43
-
44
-
 45
45 -
 46
46 -
 47
47 -
 48
48 -
 49
49 -
 50
50 -
 51
51 -
 52
52 -
 53
53 -
 54
54 -
 55
55 -
56
-
57
-
58
-
59
-
60
-
61
-
62
-
63
-
64
-
65
-
66
-
67
-
68
-
69
-
70
-
71
-
72
-
73
-
74
-
75
-
76
-
77
-
78
-
79
-
80
-
81
-
82
-
83
-
84
-
85
-
86
-
87
-
88
-
89
-
90
-
91
-
92
-
93
-
94
-
95
-
96
-
97
-
98
-
99
-
100
-
101
-
102
-
103
-
104
-
105
-
106
-
107
-
108
-
109
-
110
-
111
-
112
-
113
-
114
-
115
-
116
-
117
-
118
-
119
-
120
-
121
-
122
-
123
-
124
-
125
-
126
-
127
-
128
 |
 |
