Ricoh P C600 Setup Guide - Page 28
Quick Installation, Quick Installation via a Network, Quick Installation via a USB Connection
 |
View all Ricoh P C600 manuals
Add to My Manuals
Save this manual to your list of manuals |
Page 28 highlights
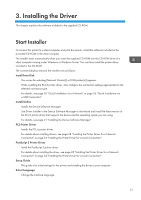
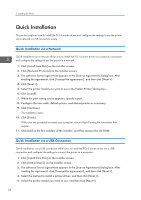
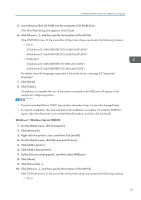
3. Installing the Driver Quick Installation This section explains how to install the PCL 6 printer driver and configure the settings to use the printer via a network or USB connection easily. Quick Installation via a Network Quick installation via a network allows you to install the PCL 6 printer driver via a network connection and configure the settings to use the printer in a network. 1. Click [Install from Disk] on the installer screen. 2. Click [Network Printer(s)] on the installer screen. 3. The software license agreement appears in the [License Agreement] dialog box. After reading the agreement, click [I accept the agreement.], and then click [Next >]. 4. Click [Next >]. 5. Select the printer model you want to use in the [Select Printer] dialog box. 6. Click [Install]. 7. When the port setting screen appears, specify a port. 8. Configure the user code, default printer, and shared printer as necessary. 9. Click [Continue]. The installation starts. 10. Click [Finish]. When you are prompted to restart your computer, restart it by following the instructions that appear. 11. Click [Exit] in the first window of the installer, and then remove the CD-ROM. Quick Installation via a USB Connection Quick installation via a USB connection allows you to install the PCL 6 printer driver via a USB connection and configure the settings to connect the printer to a computer. 1. Click [Install from Disk] on the installer screen. 2. Click [USB printer(s)] on the installer screen. 3. The software license agreement appears in the [License Agreement] dialog box. After reading the agreement, click [I accept the agreement.], and then click [Next >]. 4. Select the method to install a printer driver, and then click [Next >]. 5. Select the printer model you want to use, and then click [Next >]. 26
-
 1
1 -
2
-
3
-
4
-
5
-
6
-
7
-
8
-
9
-
10
-
11
-
12
-
13
-
14
-
15
-
16
-
17
-
18
-
19
-
20
-
21
-
22
-
 23
23 -
 24
24 -
 25
25 -
 26
26 -
 27
27 -
 28
28 -
 29
29 -
 30
30 -
 31
31 -
 32
32 -
 33
33 -
34
-
35
-
36
-
37
-
38
-
39
-
40
-
41
-
42
-
43
-
44
-
45
-
46
-
47
-
48
-
49
-
50
-
51
-
52
-
53
-
54
-
55
-
56
-
57
-
58
-
59
-
60
 |
 |