Ricoh SP 4510DN User Guide - Page 36
When entering an IPv4 address, do not begin segments with zeros. For example: If the address is
 |
View all Ricoh SP 4510DN manuals
Add to My Manuals
Save this manual to your list of manuals |
Page 36 highlights
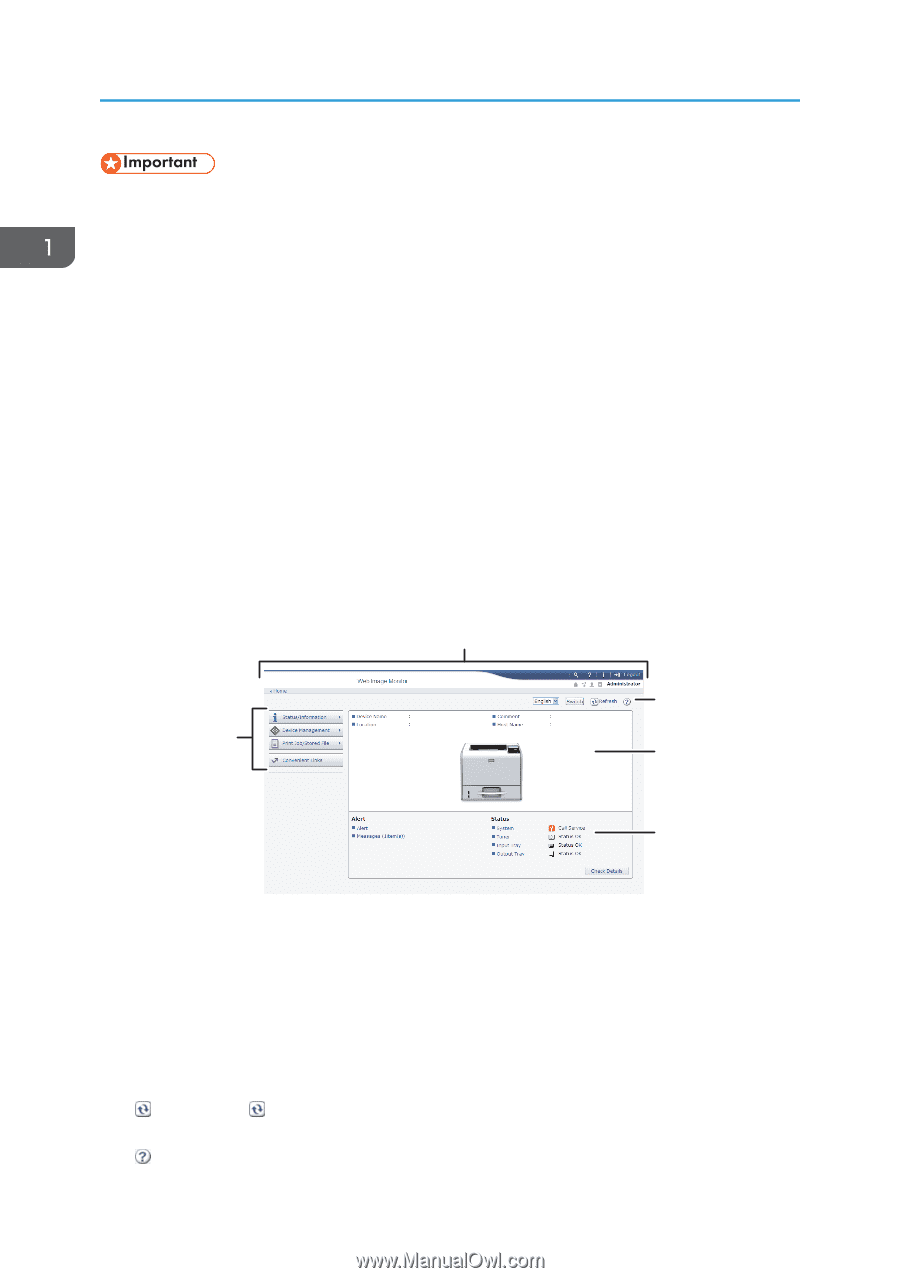
1. Getting Started • When entering an IPv4 address, do not begin segments with zeros. For example: If the address is "192.168.001.010", you must enter it as "192.168.1.10". 1. Start your Web browser. 2. Enter "http://(printer's IP address or host name)/" in your Web browser's address bar. The top page of Web Image Monitor appears. If the printer's host name has been registered on the DNS or WINS server, you can enter it. When setting SSL, a protocol for encrypted communication, under the environment in which server authentication is issued, enter "https://(printer's IP address or host name)/". 3. To log in to Web Image Monitor in the administrator mode, click [Login] on the top page. The window for entering the login user name and password appears. 4. Enter your login user name and password, and then click [Login]. For details about the login user name and password, contact your administrator. Depending on the configuration of your Web browser, the login user name and password might be saved. If you do not want to save them, configure your Web browser's settings so that this information is not saved. 2 3 1 4 5 CYN910 1. Menu area Displays the content of a selected menu item. 2. Header area Displays the dialog box for switching to the user mode and administrator mode and the menu for each mode. Also displays the link to Help and dialog box for keyword search. 3. Refresh/Help (Refresh): Click at the upper right in the work area to update the printer information. Click the Web browser's [Refresh] button to refresh the entire browser screen. (Help): Use Help to view or download Help file contents. 34
-
 1
1 -
2
-
3
-
4
-
5
-
6
-
7
-
8
-
9
-
10
-
11
-
12
-
13
-
14
-
15
-
16
-
17
-
18
-
19
-
20
-
21
-
22
-
23
-
24
-
25
-
26
-
27
-
28
-
29
-
30
-
 31
31 -
 32
32 -
 33
33 -
 34
34 -
 35
35 -
 36
36 -
 37
37 -
 38
38 -
 39
39 -
 40
40 -
 41
41 -
42
-
43
-
44
-
45
-
46
-
47
-
48
-
49
-
50
-
51
-
52
-
53
-
54
-
55
-
56
-
57
-
58
-
59
-
60
-
61
-
62
-
63
-
64
-
65
-
66
-
67
-
68
-
69
-
70
-
71
-
72
-
73
-
74
-
75
-
76
-
77
-
78
-
79
-
80
-
81
-
82
-
83
-
84
-
85
-
86
-
87
-
88
-
89
-
90
-
91
-
92
-
93
-
94
-
95
-
96
-
97
-
98
-
99
-
100
-
101
-
102
-
103
-
104
-
105
-
106
-
107
-
108
-
109
-
110
-
111
-
112
-
113
-
114
-
115
-
116
-
117
-
118
-
119
-
120
-
121
-
122
-
123
-
124
-
125
-
126
-
127
-
128
-
129
-
130
-
131
-
132
-
133
-
134
-
135
-
136
-
137
-
138
-
139
-
140
-
141
-
142
-
143
-
144
 |
 |