Ridgid BS1400 Owners Manual
Ridgid BS1400 Manual
 |
View all Ridgid BS1400 manuals
Add to My Manuals
Save this manual to your list of manuals |
Ridgid BS1400 manual content summary:
- Ridgid BS1400 | Owners Manual - Page 1
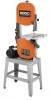
'S MANUAL 14 in. BAND SAW BS14002 L ON P I U L L P U S OFF H O PUL 10° 0° 15° 30° 4 Your new band saw has been engineered and manufactured to our high standards for dependability, ease of operation, and operator safety. When properly cared for, it will give you years of rugged, trouble - Ridgid BS1400 | Owners Manual - Page 2
n Features ...10-11 n Tools Needed...12 n Loose Parts...13-14 n Assembly ...15-24 n Operation ...25-27 n Adjustments...28-29 n Maintenance ...30-31 n Accessories ...32 n Troubleshooting ...32-33 n Warranty ...35 n Parts Ordering/Service ...36 INTRODUCTION This tool has many features for making its - Ridgid BS1400 | Owners Manual - Page 3
TOOLS WITH CARE. Keep tools sharp and clean for better and safer performance. Follow instructions for lubricating and changing accessories. n DISCONNECT ALL TOOLS. When not in use, before servicing, or when changing attachments, all tools should be disconnected. n AVOID ACCIDENTAL STARTING. Be sure - Ridgid BS1400 | Owners Manual - Page 4
We recommend that you check and adjust blade guide settings before first use of your saw. Refer to "Adjusting thrust bearings, blade guide support, and blade guides" procedures explained in the adjustments section of this operator's manual. n SAVE THESE INSTRUCTIONS. Refer to them frequently and use - Ridgid BS1400 | Owners Manual - Page 5
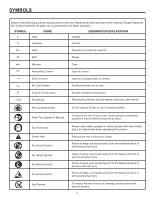
operator's manual before using this product. Eye Protection Always wear safety goggles or safety glasses with side shields and a full face shield when operating this product. Safety Alert No Hands Symbol Precautions that involve your safety. Failure to keep your hands away from the blade will - Ridgid BS1400 | Owners Manual - Page 6
servicing, use only identical replacement parts. WARNING: To avoid serious personal injury, do not attempt to use this product until you read thoroughly and understand completely the operator's manual. Save this operator's manual and review frequently for continuing safe operation and instructing - Ridgid BS1400 | Owners Manual - Page 7
operation made across the grain or the width of the workpiece. Freehand (for band saw) Performing a cut without the workpiece properly supported on the saw table. Gum A sticky, sap-based residue from wood products. Kerf The material removed by the blade in a through cut or the slot produced by the - Ridgid BS1400 | Owners Manual - Page 8
14 14 50' 16 16 16 14 14 12 100' 16 16 14 support one power tool may not be able to support two or three tools. GROUNDING INSTRUCTIONS service personnel if the grounding instructions are not completely understood, or if in doubt as to whether the tool is properly grounded. Repair or replace saw does - Ridgid BS1400 | Owners Manual - Page 9
all assembly steps are completed. NOTE: The band saw is prewired at the factory for 120 volts Cut off the 120 volt power cord plug and replace it with a 3-prong 240 volt, 15 amp. UL blade terminals. Connect the power cord green grounding wire to the plug ground prong terminal. n Plug your table saw - Ridgid BS1400 | Owners Manual - Page 10
I U L L P U S OFF H O PUL THRUST BEARINGS BEVEL SCALE 10° 0° 15° 30° 4 SCALE INDICATOR L BLADE GUARD ADJUSTMENT KNOB OTTAOFEDNBSJSCLUIAASODLTNEE 1 3 12 4 3 4 8 8 1 8 BLADE GUARD TRACKING KNOB BLADE GUIDES MOTOR PULLEY COVER SAW TABLE LOCK KNOBS DUST EXHAUST PORT LEG STAND - Ridgid BS1400 | Owners Manual - Page 11
BEARINGS Thrust bearings support the back of the blade and are adjustable for the various blade widths. BLADE GUARD ADJUSTMENT KNOBS Use the blade guide adjustment knobs to adjust the blade guide assembly. This keeps the blade from twisting or breaking. SAW TABLE WITH 90° STOPS Saw table tilts for - Ridgid BS1400 | Owners Manual - Page 12
TOOLS NEEDED The following tools (not included) are needed for checking adjustments of your saw or for installing the blade: COMBINATION WRENCH (2) 10 mm, 14 mm PHILLIPS SCREWDRIVER ADJUSTABLE WRENCH COMBINATION SQUARE STRAIGHT EDGE Fig. 7 12 - Ridgid BS1400 | Owners Manual - Page 13
with your band saw: Base ...1 Legs...4 Leveling Feet ...4 Hex Nuts (3/8-16) ...8 Leg Brace, Long ...2 Leg Brace, Short ...2 Carriage Bolts, (M8 x 1.25-16) ...40 Flat Washers...40 Lock Washers...40 Hex Nuts (M8)...40 Screws...2 Motor Support ...1 Plate Support ...1 Operator's Manual (Not Shown - Ridgid BS1400 | Owners Manual - Page 14
LOOSE PARTS The following items are included with your band saw: V-Belt...1 Saw Table ...1 Pulley Cover ...1 Motor with Switch ...1 Band Saw ...1 Trunnion Support...1 Dust Chute ...1 Bevel Scale...1 Scale Indicator ...1 Rubber Grommet ...4 Switch Key ...1 Blade Hanger...2 Lock Knob ...2 SAW TABLE - Ridgid BS1400 | Owners Manual - Page 15
movement, leveling feet must be adjusted so that saw does not rock. After the band saw has been attached to the leg stand, it will be necessary to adjust the leveling feet. WARNING: Do not attempt to modify this tool or create accessories not recommended for use with this tool. Any such alteration - Ridgid BS1400 | Owners Manual - Page 16
sit flat on the ground. Adjustment of the feet will be completed after the band saw is attached to the stand. n Place motor support under the base. n Insert screws through holes in the base and thread into motor support as shown. n Tighten all stand fasteners at this time. n With the aid of a second - Ridgid BS1400 | Owners Manual - Page 17
MOUNTING THE MOTOR ASSEMBLY See Figure 14. n Locate the following items: : Use of rubber grommets is essential for eliminating excessive vibration. n Set motor on rubber grommets and fasten to n Tension V-belt by moving motor away from the saw body and tighten the motor mount nuts. Do not - Ridgid BS1400 | Owners Manual - Page 18
HANGERS See Figure 18. n Locate the following items. 4 pan head screws, (M4 x 0.7-10) 4 hex nuts, (M4 x 0.7) 4 lock washers, (M4) 2 blade hangers 1 pulley cover n Align blade hangers over the holes on opposite sides of the pulley cover. Make sure they are pointing in opposite directions. Fasten - Ridgid BS1400 | Owners Manual - Page 19
and install dust chute pointing down. Thread pan head screws from the inside of the lower blade guard cover into the dust chute. n Close lower blade guard cover. MOUNTING THE TABLE TRUNNION SUPPORT TO BAND SAW See Figure 22. n Locate the following items: 2 hex head bolts (M8 x 35) 2 lock washers (M8 - Ridgid BS1400 | Owners Manual - Page 20
pull table pin out from the table. Rotate saw table 90° and guide saw blade through slot in saw table. n R� otate saw table back and place table screws into trunnion support. Attach using lock knobs. TRUNNION SUPPORT SAW BLADE PAN HEAD SCREW POINTER SAW TABLE LL Fig. 24 THROAT PLATE 10° 0° 15 - Ridgid BS1400 | Owners Manual - Page 21
machine only after reading the entire operator's manual including blade tracking, blade guide adjustments, and safety rules. ADJUSTING BLADE TENSION See Figures 27 - 28. As you become familiar with the saw, you may find it necessary to change the blade tension from the initial setting. Changes in - Ridgid BS1400 | Owners Manual - Page 22
lock knobs by turning clockwise. SQUARING THE SAW TABLE TO THE BLADE See Figure 31. n Turn the blade guide adjustment knob counterclockwise to unlock the blade guide assembly. Raise the blade guide assembly as far as it will go. Turn the blade guide adjustment knob clockwise to retighten. n Place - Ridgid BS1400 | Owners Manual - Page 23
or loosen set screw until desired tension is reached, and replace blade guard adjustment knob. ADJUSTING UPPER BLADE GUIDES AND THRUST BEARING See Figures 33 - 34. WARNING: Blade guard has been removed for picture clarity. Never operate the band saw without all guards in place and in working order - Ridgid BS1400 | Owners Manual - Page 24
thickness of a dollar bill on each side of blade is a good rule of thumb. n Tighten thumb screw. n Loosen thumb screw and move the guide block support in or out until the front edge of the guide blocks are just behind the "gullets" of the saw teeth. n Tighten thumb screw. n Loosen thumb screw and - Ridgid BS1400 | Owners Manual - Page 25
cross cutting, ripping, mitering, beveling, compound cutting, and resawing. It is not capable of making inside or non-through cuts. This band saw is designed to cut wood and wood composition products only. Before starting a cut, watch the saw run. If you experience excessive vibration or unusual - Ridgid BS1400 | Owners Manual - Page 26
adjusted, that the blade guide knob is tight, and that no parts have excessive play. n To avoid accidental blade contact, minimize blade breakage, and provide maximum blade support, always adjust the blade guide assembly to just clear the workpiece. n Use only recommended accessories. n With the - Ridgid BS1400 | Owners Manual - Page 27
, check angle markings. n Retighten the lock knob to hold saw table securely in place. CIRCLE CUTTING See Figure 39. n Adjust the upper guides to vertically just clear the workpiece. n Use both hands while feeding the work into the blade. Hold the workpiece firmly against the table. Use gentle - Ridgid BS1400 | Owners Manual - Page 28
to protect your eyes while uncoiling band saw blades. Failure to do so could result in possible serious personal injury. SAW TABLE BLADE GUARD INSTALLING AND ADJUSTING THE BLADE See Figures 40 - 41. n Turn the saw off, remove the switch key, and unplug the saw from the power source. n Remove the - Ridgid BS1400 | Owners Manual - Page 29
to set the height of the blade guide assembly. Adjust the blade guide assembly by raising or lowering. n Lock blade guide assembly in place by turning the blade guard adjustment knob clockwise. n Always lock the blade guide assembly in place before turning on the band saw. WARNING: Maintain proper - Ridgid BS1400 | Owners Manual - Page 30
oils, etc., come in contact with plastic parts. They contain chemicals that can damage, weaken or destroy plastic. n Keep your band saw clean. n Remove sawdust from the inside frequently. n Do not allow pitch to accumulate on the saw table, blade guides, or thrust bearings. Clean them with gum - Ridgid BS1400 | Owners Manual - Page 31
required. BRUSH See Figure 43. There is a brush located inside the saw housing, next to the lower wheel. It helps protect the tire and wheel by brushing off saw dust. As the brush becomes worn, it will need to be adjusted or replaced. n Remove the screw then pull the brush off. n Place the new - Ridgid BS1400 | Owners Manual - Page 32
Item ...Part No. Rip Fence ...AC5001 Riser Block ...AC5005 Sanding Belts ...AC5006 Cool Blocks™ ...AC5007 Miter Gauge...AC1021 Herc-U-Lift PLUS™...AC9950 WARNING: Current attachments and accessories available for use with this tool are listed above. Do not use any attachments or accessories not - Ridgid BS1400 | Owners Manual - Page 33
correct cutting technique. See Operation section. Blade dulls too quickly. Blade guides set too close to teeth. Cutting incorrect material. Adjust upper and lower blades guides. See Assembly section "Installing and Adjusting the blade". Band saw vibrates. Too much tension on motor belt. Adjust - Ridgid BS1400 | Owners Manual - Page 34
NOTES 34 - Ridgid BS1400 | Owners Manual - Page 35
-539-1710 or by logging on to the RIDGID® website at www.ridgid.com. When requesting warranty service, you must present the original dated sales receipt. The authorized service center will repair any faulty workmanship, and either repair or replace any part covered under the warranty, at our option - Ridgid BS1400 | Owners Manual - Page 36
OPERATOR'S MANUAL 14 in. BAND SAW BS14002 CUSTOMER SERVICE INFORMATION For parts or service, contact your nearest Ridgid authorized service center. Be sure to provide all relevant information when you call or visit. For the location of the authorized service center nearest you, please call 1-866-
-
 1
1 -
 2
2 -
 3
3 -
 4
4 -
 5
5 -
 6
6 -
 7
7 -
8
-
9
-
10
-
11
-
12
-
13
-
14
-
15
-
16
-
17
-
18
-
19
-
20
-
21
-
22
-
23
-
24
-
25
-
26
-
27
-
28
-
29
-
30
-
31
-
32
-
33
-
34
-
35
-
36
 |
 |

Your new band saw has been engineered and manufactured to our high standards for dependability, ease of operation, and
operator safety. When properly cared for, it will give you years of rugged, trouble-free performance.
WARNING:
To reduce the risk of injury, the user must read and understand the operator’s manual before using this
product.
Thank you for buying a RIDGID product.
SAVE THIS MANUAL FOR FUTURE REFERENCE
0
°
15
°
30
°
4
10
°
OFF
O
ON
I
P
L
U
L
OPERATOR’S MANUAL
14 in. BAND SAW
BS14002