Ridgid BS1400 Owners Manual - Page 18
Mounting Blade Hangers, Mounting The Pulley Cover
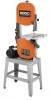 |
View all Ridgid BS1400 manuals
Add to My Manuals
Save this manual to your list of manuals |
Page 18 highlights
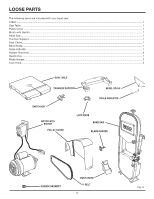
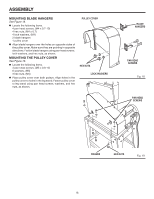
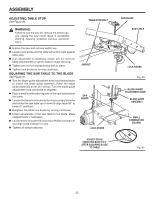
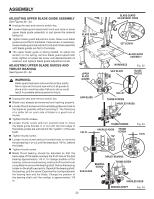
ASSEMBLY MOUNTING BLADE HANGERS See Figure 18. n Locate the following items. 4 pan head screws, (M4 x 0.7-10) 4 hex nuts, (M4 x 0.7) 4 lock washers, (M4) 2 blade hangers 1 pulley cover n Align blade hangers over the holes on opposite sides of the pulley cover. Make sure they are pointing in opposite directions. Fasten blade hangers using pan head screws, lock washers, and hex nuts, as shown. MOUNTING THE PULLEY COVER See Figure 19. n Locate the following items. 3 pan head screws, (M5 x 0.8-12) 6 washers, (M5) 3 hex nuts, (M5) n Place pulley cover over both pulleys. Align holes in the pulley cover to holes in the leg stand. Fasten pulley cover to leg stand using pan head screws, washers, and hex nuts, as shown. PULLEY COVER HEX NUTS LOCK WASHERS BLADE HANGERS PAN HEAD SCREWS Fig. 18 PAN HEAD SCREWS WASHER HEX NUTS Fig. 19 18
-
 1
1 -
2
-
3
-
4
-
5
-
6
-
7
-
8
-
9
-
10
-
11
-
12
-
 13
13 -
 14
14 -
 15
15 -
 16
16 -
 17
17 -
 18
18 -
 19
19 -
 20
20 -
 21
21 -
 22
22 -
 23
23 -
24
-
25
-
26
-
27
-
28
-
29
-
30
-
31
-
32
-
33
-
34
-
35
-
36
 |
 |
