Ridgid R2401 Operation Manual - Page 12
Maintenance, S Illustrations Start On After French And Spanish Language S. - trim router parts
 |
View all Ridgid R2401 manuals
Add to My Manuals
Save this manual to your list of manuals |
Page 12 highlights
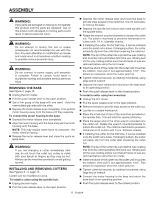
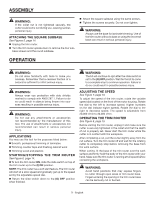
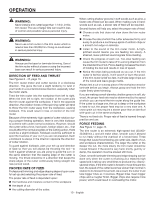
MAINTENANCE WARNING: When servicing use only identical RIDGID replacement parts. Use of any other parts may create a hazard or cause product damage. WARNING: Always wear eye protection with side shields marked to comply with ANSI Z87.1. Failure to do so could result in objects being thrown into your eyes resulting in possible serious injury. GENERAL MAINTENANCE Avoid using solvents when cleaning plastic parts. Most plastics are susceptible to damage from various types of commercial solvents and may be damaged by their use. Use clean cloths to remove dirt, dust, oil, grease, etc. WARNING: Do not at any time let brake fluids, gasoline, petroleum-based products, penetrating oils, etc., come in contact with plastic parts. Chemicals can damage, weaken or destroy plastic which may result in serious personal injury. Electric tools used on fiberglass material, wallboard, spackling compounds, or plaster are subject to accelerated wear and possible premature failure because the fiberglass chips and grindings are highly abrasive to bearings, brushes, commutators, etc. Consequently, we do not recommended using this tool for extended work on these types of materials. However, if you do work with any of these materials, it is extremely important to clean the tool using compressed air. LUBRICATION All of the bearings in this tool are lubricated with a sufficient amount of high grade lubricant for the life of the unit under normal operating conditions. Therefore, no further lubrication is required. BRUSH REPLACEMENT See Figures 16, page 16. Unplug the trim router. Remove cutter bit if there is one installed. With a flat head screwdriver, remove the brush cap and washer. Remove the brush assembly. Check for wear. If worn, always replace in pairs. Do not replace one side without replacing the other. Replace the brush assembly. Make sure the notches in the washer on the spring line up so that the washer on the spring lies flat. Replace the washer and brush cap and tighten with a screwdriver. Do not overtighten. Repeat for other side. The trim router is now ready for use. NOTE: FIGURES (ILLUSTRATIONS) START ON PAGE 14 AFTER FRENCH AND SPANISH LANGUAGE SECTIONS. 12 - English
-
 1
1 -
2
-
3
-
4
-
5
-
6
-
 7
7 -
 8
8 -
 9
9 -
 10
10 -
 11
11 -
 12
12 -
 13
13 -
 14
14 -
 15
15 -
 16
16 -
 17
17 -
18
-
19
-
20
-
21
-
22
-
23
-
24
-
25
-
26
-
27
-
28
-
29
-
30
-
31
-
32
-
33
-
34
-
35
-
36
-
37
-
38
-
39
-
40
 |
 |
