Ridgid WD1956 Owners Manual - Page 8
Drum/Caddy Assembly
 |
View all Ridgid WD1956 manuals
Add to My Manuals
Save this manual to your list of manuals |
Page 8 highlights
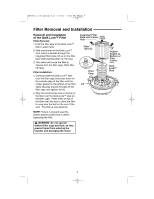
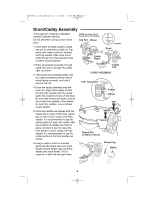
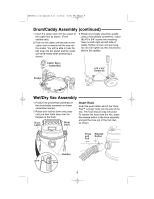
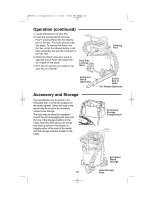
SP6731-1 16 Gallon E S 2/3/12 2:06 PM Page 8 Drum/Caddy Assembly If any parts are missing or damaged contact Customer Service. Do not assemble until you have all the parts. 1. Invert drum to install caddies. Install cap nut on one side of shaft rod. Tap gently with rubber mallet or hammer until fully seated. Slide open end of shaft through the wheel (smooth side of wheel facing outward). NOTE: Smooth side of the wheel to the outside. Cap Nut Wheel Cap Nut Shaft RIGHT Caddy Right 2. Place wheel/shaft assembly through caddy left and on through the caddy right, as shown. 3. Then place the remaining wheel onto the caddy assembly (smooth side of wheel facing outward), and install second cap nut. Caddy Left CADDY ASSEMBLY 1/16" Clearance 4. Place the caddy assembly onto the drum rim. Align inside edges of both left and right caddies with the raised outer ribs, located on back of the drum. Be sure that wheels spin freely, and do not contact the caddies. If the wheels do touch the caddies, move caddies inward slightly. Caddy Wheel TAP 5. Once the caddies are aligned with the raised ribs on back of the drum, gently tap on rear of each caddy until firmly seated. It is recommended to tap the center portion of each rear caddy. After rear portions of caddies are firmly in place, proceed to tap into place the front portion of each caddy until fully seated. It is recommended to tap the center portion of the front caddies as shown. 6. Using a rubber mallet or hammer, gently tap the wheel caps onto each wheel until the wheel caps are firmly seated onto each wheel. This is required on both left and right sides. TAP Raised Rib on Back of Drum Wheel Cap Mallet 8
-
 1
1 -
2
-
 3
3 -
 4
4 -
 5
5 -
 6
6 -
 7
7 -
 8
8 -
 9
9 -
 10
10 -
 11
11 -
 12
12 -
 13
13 -
14
-
15
-
16
-
17
-
18
-
19
-
20
-
21
-
22
-
23
-
24
-
25
-
26
-
27
-
28
-
29
-
30
-
31
-
32
-
33
-
34
-
35
-
36
-
37
-
38
-
39
-
40
-
41
-
42
-
43
-
44
-
45
-
46
-
47
-
48
-
49
-
50
-
51
-
52
-
53
-
54
-
55
-
56
-
57
-
58
-
59
-
60
 |
 |
