Ridgid WD1956 Owners Manual - Page 9
Wet/Dry Vac Assembly, Drum/Caddy Assembly continued
 |
View all Ridgid WD1956 manuals
Add to My Manuals
Save this manual to your list of manuals |
Page 9 highlights
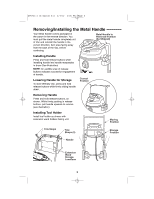
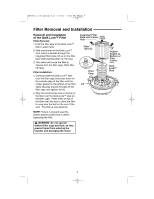
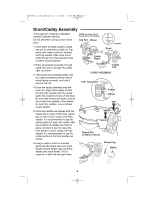
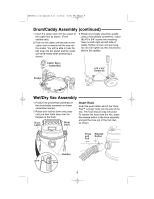
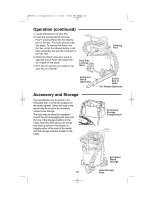
SP6731-1 16 Gallon E S 2/3/12 2:06 PM Page 9 Drum/Caddy Assembly (continued) 7. Insert the caster stem into the socket of the caster foot as shown. (Front casters only). 8. Push on the caster until the ball on the caster stem is inserted all the way into the socket. You will be able to hear the ball snap into the socket and the caster will swivel easily when positioning is correct. 9. Rotate drum/caddy assembly upright, using a long phillips screwdriver, install (8) #10 x 3/4" screws into matching holes on both right and left side of caddy. Tighten screws until just snug. Do not over tighten as this may tend to deform the caddies. Caster Stem Caster Ball #10 x 3/4" Screw (8) Socket LEFT Wet/Dry Vac Assembly 1. Position the powerhead assembly on the drum/caddy assembly as shown (assembled earlier). 2. Rotate both latches down and press until you hear them snap over the flanges on the drum. Drum Latch Drum Latch Insert Hose Insert the push button end of the "DualFlex™ Locking" hose into the inlet of the Vac. The hose should snap into place. To remove the hose from the Vac, press the release button in the hose assembly and pull the hose out of the Vac inlet, as shown. Press Release and Button Pull Latch Handles Drum 9
-
 1
1 -
2
-
3
-
 4
4 -
 5
5 -
 6
6 -
 7
7 -
 8
8 -
 9
9 -
 10
10 -
 11
11 -
 12
12 -
 13
13 -
 14
14 -
15
-
16
-
17
-
18
-
19
-
20
-
21
-
22
-
23
-
24
-
25
-
26
-
27
-
28
-
29
-
30
-
31
-
32
-
33
-
34
-
35
-
36
-
37
-
38
-
39
-
40
-
41
-
42
-
43
-
44
-
45
-
46
-
47
-
48
-
49
-
50
-
51
-
52
-
53
-
54
-
55
-
56
-
57
-
58
-
59
-
60
 |
 |
