Rocketfish RF-TVMP20 User Manual (English) - Page 7
You'll need, STEP 3: Option 1
 |
View all Rocketfish RF-TVMP20 manuals
Add to My Manuals
Save this manual to your list of manuals |
Page 7 highlights
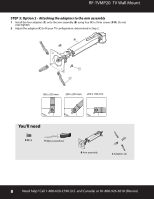
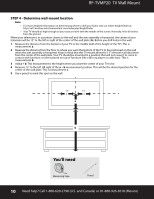
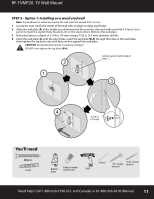
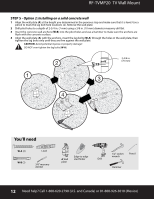
RF-TVMP20 TV Wall Mount STEP 3: Option 1- Attaching the arm assembly without the adapters 1 Align the arm assembly (B) with the screw holes on the back of the TV. 2 Install screws (M-A, M-B, or M-C) securely into the four holes in the back of the TV. Do not over-tighten. Note: The arm assembly (B) should be level on the back of the TV. Proceed to Step 4 Determine wall mount location. 75 x 75mm 100 x 100mm 100mm (3-15/16") 75mm (2-15/16") 100mm (3-15/16") 75mm (2-15/16") TV B M-A OR M-B OR M-C You'll need Screws OR OR M-A (4) M-B (4) M-C (4) Level Phillips screwdriver B Arm assembly Need help? Call 1-800-620-2790 (U.S. and Canada) or 01-800-926-3010 (Mexico) 7
-
 1
1 -
 2
2 -
 3
3 -
 4
4 -
 5
5 -
 6
6 -
 7
7 -
 8
8 -
 9
9 -
 10
10 -
 11
11 -
 12
12 -
13
-
14
-
15
-
16
 |
 |

7
Need help? Call 1-800-620-2790 (U.S. and Canada) or 01-800-926-3010 (Mexico)
RF-TVMP20
TV Wall Mount
STEP 3: Option 1-
Attaching the arm assembly without the adapters
1
Align the arm assembly (
B
) with the screw holes on the back of the TV.
2
Install screws (
M-A, M-B,
or
M-C
) securely into the four holes in the back of the TV. Do not over-tighten.
Note
: The arm assembly (
B
) should be level on the back of the TV. Proceed to Step 4 Determine wall mount location.
You’ll need
75 x 75mm
100 x 100mm
100mm (3-15/16”)
75mm (2-15/16”)
100mm (3-15/16”)
75mm (2-15/16”)
OR
M-A
B
OR
M-B
M-C
TV
M-A
(4)
M-B
(4)
Phillips screwdriver
OR
OR
Screws
M-C
(4)
Level
B
Arm assembly