Ryobi P546A User Manual - Page 16
Stopping The Engine, Adjusting Idle Speed, Warning
 |
View all Ryobi P546A manuals
Add to My Manuals
Save this manual to your list of manuals |
Page 16 highlights
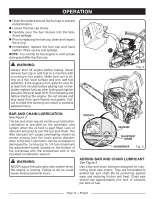
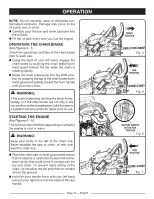
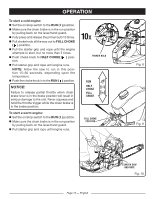
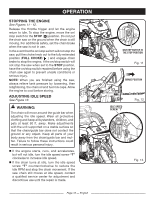
OPERATION STOPPING THE ENGINE See Figures 11 - 12. Release the throttle trigger and let the engine return to idle. To stop the engine, move the on/ stop switch to the STOP ( ) position. Do not put the chain saw on the ground when the chain is still STOP moving. For additional safety, set the chain brake when the saw is not in use. In the event that the on/stop switch will not stop the saw, pull the choke knob out to the fully extended position (FULL CHOKE / ) and engage chain brake to stop the engine. If the on/stop switch will not stop the saw when set to the STOP position, have the on/stop switch repaired before using the chain saw again to prevent unsafe conditions or serious injury. NOTE: When you are finished using the saw, always relieve tank pressure by loosening, then retightening, the chain oil and fuel mix caps. Allow the engine to cool before storing. ADJUSTING IDLE SPEED See Figure 13. WARNING: The chain will move around the guide bar when adjusting the idle speed. Wear all protective clothing and keep all bystanders, children, and pets at least 50 ft. away. Make adjustments with the unit supported on a stable surface so that the chain/guide bar does not contact the ground or any object. Keep all parts of your body away from the chain/guide bar and muffler. Failure to follow these instructions could result in serious personal injury. STOP n If the engine starts, runs, and accelerates, but will not idle, turn the idle speed screw "T" clockwise to increase idle speed. n If the chain turns at idle, turn the idle speed screw "T" counterclockwise to reduce the idle RPM and stop the chain movement. If the saw chain still moves at idle speed, contact a qualified service center for adjustment and discontinue use until the repair is made. STOP ON/STOP SWITCH IN THE STOP POSITION Fig. 11 BRAKE POSITION IDLE SPEED SCREW "T" Fig. 12 Fig. 13 Page 16 - English
-
 1
1 -
2
-
3
-
4
-
5
-
6
-
7
-
8
-
9
-
10
-
 11
11 -
 12
12 -
 13
13 -
 14
14 -
 15
15 -
 16
16 -
 17
17 -
 18
18 -
 19
19 -
 20
20 -
 21
21 -
22
-
23
-
24
-
25
-
26
-
27
-
28
-
29
-
30
-
31
-
32
-
33
-
34
-
35
-
36
-
37
-
38
-
39
-
40
-
41
-
42
-
43
-
44
-
45
-
46
-
47
-
48
-
49
-
50
-
51
-
52
-
53
-
54
-
55
-
56
-
57
-
58
-
59
-
60
-
61
-
62
-
63
-
64
-
65
-
66
-
67
-
68
-
69
-
70
-
71
-
72
-
73
-
74
-
75
-
76
-
77
-
78
-
79
-
80
-
81
-
82
-
83
-
84
-
85
-
86
-
87
-
88
-
89
-
90
-
91
-
92
-
93
-
94
-
95
-
96
-
97
-
98
-
99
-
100
-
101
-
102
-
103
-
104
-
105
-
106
-
107
-
108
-
109
-
110
-
111
-
112
-
113
-
114
-
115
-
116
-
117
-
118
-
119
-
120
-
121
-
122
-
123
-
124
 |
 |
