Samsung 570DX User Manual (user Manual) (ver.1.0) (English) - Page 13
ENTER, SOURCE, AV / S-Video, Component, Power button, Brightness Sensor, Power indicator - hdmi
 |
UPC - 729507801155
View all Samsung 570DX manuals
Add to My Manuals
Save this manual to your list of manuals |
Page 13 highlights
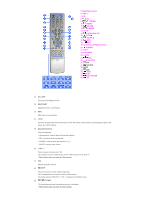
Moves from one menu item to another horizontally or adjusts selected menu values. Adjusts the audio volume. 4) ENTER Activates a highlighted menu item. 5) SOURCE Switches from PC mode to Video mode. Changing the source is only allowed for external devices that are connected to the LCD Display at the time. [PC] → [BNC] → [DVI] → [AV] → [S-Video] → [Component] → [HDMI] >> Click here to see an animation clip. 6) PIP Push the PIP button to turn the PIP screen On / Off. More than one PIP cannot overlap on screen as BNC and the component use the same terminal. >> Click here to see an animation clip. • PC AV / S-Video / Component / HDMI Mode • BNC AV / S-Video / HDMI Mode • DVI AV / S-Video / Component Mode • AV / S-Video PC / BNC / DVI Mode • Component PC / DVI Mode • HDMI PC / BNC Mode 7) Power button Turns the LCD Display On/Off. 8) Brightness Sensor The product's Brightness Sensor function automatically detects the surrounding brightness using a brightness sensor and adjusts its brightness accordingly. 9) Power indicator Shows PowerSaver mode by blinking green. 10) Remote Control Sensor Aim the remote control towards this spot on the LCD Display. Note • See PowerSaver described in the manual for further information regarding power saving functions. For energy conservation, turn your LCD Display OFF when it is not needed or when leaving it unattended for long periods. Rear Note • For detailed information concerning cable connections, refer to Connecting Cables under Setup. The LCD Display 's configuration at the back may vary slightly depending on the LCD Display model.
-
 1
1 -
2
-
3
-
4
-
5
-
6
-
7
-
 8
8 -
 9
9 -
 10
10 -
 11
11 -
 12
12 -
 13
13 -
 14
14 -
 15
15 -
 16
16 -
 17
17 -
 18
18 -
19
-
20
-
21
-
22
-
23
-
24
-
25
-
26
-
27
-
28
-
29
-
30
-
31
-
32
-
33
-
34
-
35
-
36
-
37
-
38
-
39
-
40
-
41
-
42
-
43
-
44
-
45
-
46
-
47
-
48
-
49
-
50
-
51
-
52
-
53
-
54
-
55
-
56
-
57
-
58
-
59
-
60
-
61
-
62
-
63
-
64
-
65
-
66
-
67
-
68
-
69
-
70
-
71
-
72
-
73
-
74
-
75
-
76
-
77
-
78
 |
 |
