Samsung AA59-00411A User Manual (user Manual) (ver.1.0) (English) - Page 12
Memorizing the Channels, Storing Channels in Memory Automatic Method - remote
 |
UPC - 811558012564
View all Samsung AA59-00411A manuals
Add to My Manuals
Save this manual to your list of manuals |
Page 12 highlights
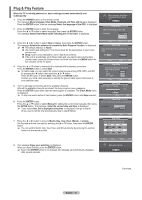
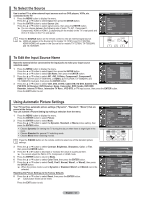
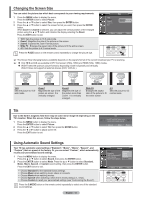
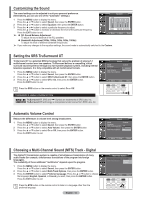
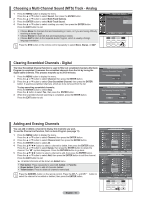
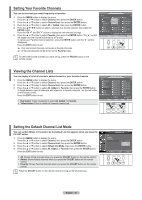
Setting the Clock Automatically 9 Press the ENTER button. Press the ▲ or ▼ button to select On or Off, then the ENTER button. The message Select the time zone where you are located. is displayed. 10 Press the ▲ or ▼ button to highlight the time zone for your local area. Press the ENTER button. If clock is not automatically set, see pages 18~19 to set the clock. 11 The message Enjoy your watching. is displayed. When you have finished, press the ENTER button. ➢ Even if the ENTER button is not pressed, the message will automatically disappear after several seconds. If you want to reset this feature... 1 Press the MENU button to display the menu. Press the ▲ or ▼ button to select Setup, then press the ENTER button. 2 Press the ENTER button to select Plug & Play. For further details on setting up options, refer to the page 10. ➢ The Plug & Play feature is only available in the TV mode. Plug & Play Set to daylight saving time. DST Off On Move Enter Skip Plug & Play Select the time zone where you are located. Newfoundland Atlantic Eastern Central Mountain Pacific Alaska Hawaii Move Enter Skip Enjoy your watching. OK Memorizing the Channels Your TV can memorize and store all of the available channels for both air and cable channels. After the available channels are memorized, use the CH and CH button to scan through the channels. This eliminates the need to change channels by entering the channel digits. There are three steps for memorizing channels: selecting a broadcast source, memorizing the channels(automatic) and adding or deleting channels(manual). Selecting the Video Signal-source Before your television can begin memorizing the available channels, you must specify the type of signal source that is connected to the TV(i.e. an air or a cable system). 1 Press the MENU button to display the menu. Press the ▲ or ▼ button to select Channel, then press the ENTER button. 2 Press the ENTER button select Antenna. Press the ▲ or ▼ button to select Air or Cable, then press the ENTER button. Storing Channels in Memory (Automatic Method) 3 Press the ▲ or ▼ button to select Auto Program, then press the ENTER button. 4 Press the ▲ or ▼ button to select the antenna connection, then press the ENTER button. ➢ Air: "Air" antenna signal. Cable: "Cable" antenna signal. Air+Cable: "Air" and "Cable" antenna signals. ➢ If you selected "Air", then go to step 7. 5 Press the ▲ or ▼ button to select Cable, then press the ENTER button. The cable system menu is displayed . 6 Press the ◄ button, then the ▲ or ▼ button to select the cable system for analog and digital channels respectively. Press the ► button to select Start, then press the ENTER button. ➢ If you have Digital cable, select the signal source for both Analog and Digital. ➢ STD, HRC, and IRC identify various types of cable TV systems. Contact your local cable company to identify the type of cable system that exists in your particular area. At this point the signal source has been selected. 7 After all the available channels are stored, the Auto Program menu reappears. You can also press the AUTO PROG. button on the remote control to bring up the Auto Program menu. Channel Antenna : AAiirr Auto Program Cable Clear Scrambled Channel Channel List Name Fine Tune Signal Strength Move Enter Return Auto Program Selects the antenna to execute the Auto Program function. Air Cable Air + Cable Start Start Start Move Enter Return Auto Program Selects a cable signal type for your location. Analog STD Start HRC IRC Digital STD HRC IRC Move Enter Return Auto Program Auto Program in Progress. Stop Enter Air 16 15% Return English - 11
-
 1
1 -
2
-
3
-
4
-
5
-
6
-
 7
7 -
 8
8 -
 9
9 -
 10
10 -
 11
11 -
 12
12 -
 13
13 -
 14
14 -
 15
15 -
 16
16 -
 17
17 -
18
-
19
-
20
-
21
-
22
-
23
-
24
-
25
-
26
-
27
-
28
-
29
-
30
-
31
-
32
-
33
-
34
-
35
-
36
 |
 |
