Samsung DVD-C639P User Manual - Page 21
Setting Up the Audio Options, Setting Up the Language Features
 |
View all Samsung DVD-C639P manuals
Add to My Manuals
Save this manual to your list of manuals |
Page 21 highlights
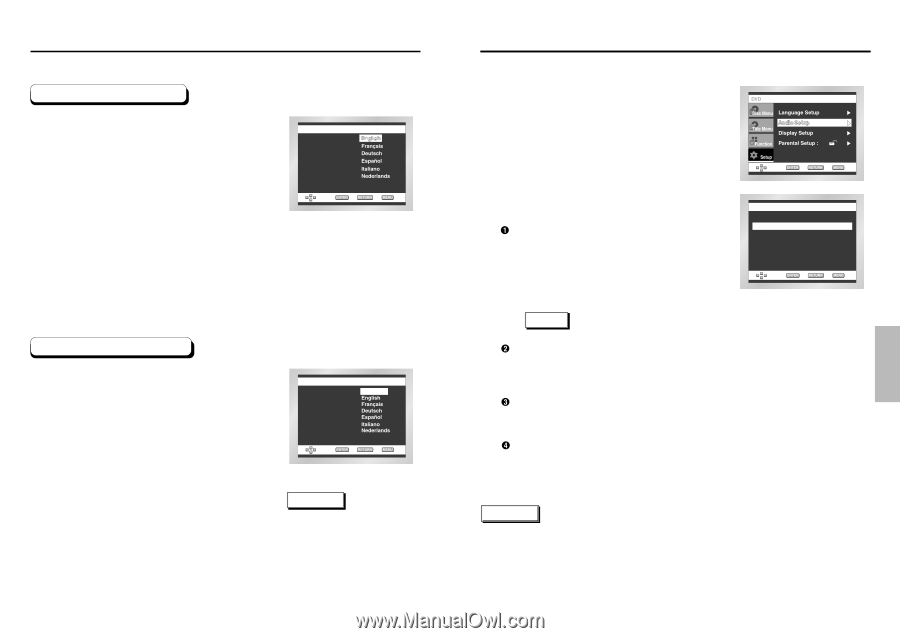
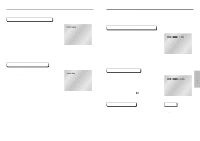
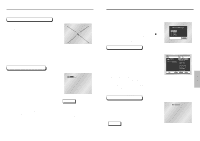
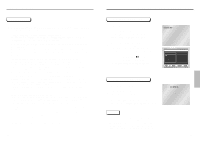
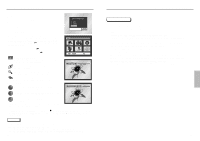
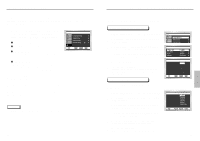
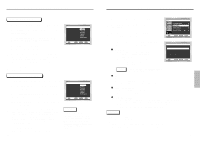
Setting Up the Language Features Using the Audio Language 1 With the unit in Stop mode, press the MENU button. 2 Select Setup using UP/DOWN buttons, then RIGHT or ENTER button. Audio 3 Select Language Setup using UP/DOWN buttons, then press the RIGHT or ENTER button. 4 Select Audio using UP/DOWN buttons, then press the RIGHT or ENTER button. 5 Press the UP/DOWN buttons to select 'English'. - Select "Original" if you want the default soundtrack language to be the original language the disc is recorded in. - Select "Others" if the language you want is not listed. 6 Press the ENTER button. - English is selected and the screen returns to SETUP menu. AUDIO LANGUAGE Original Others Using the Subtitle Language 1 With the unit in Stop mode, press the MENU button. 2 Select Setup using UP/DOWN buttons, then RIGHT or ENTER button. Subtitle SUBTITLE LANGUAGE Automatic 3 Select Language Setup using UP/DOWN buttons, then press the RIGHT or ENTER button. Others 4 Select Subtitle using UP/DOWN buttons, then press the RIGHT or ENTER button. 5 Use the UP/DOWN buttons to select 'English'. - Select "Automatic" if you want the subtitle language to be the same as the language selected as the audio preference. - Select "Others" if the language you want is not listed. Some discs may not contain the language you select as your initial language; in that case the disc will use its original language setting. 6 Press the ENTER button. - English is selected and the screen returns to SETUP menu. NOTE • If the selected language is not recorded on the disc, the original pre-recorded language is selected. • How to make the SETUP menu disappear or return to menu screen during set up; Press RETURN or LEFT button. 40 Setting Up the Audio Options 1 With the unit in Stop mode, press the MENU button. 2 Select Setup using UP/DOWN buttons, then RIGHT or ENTER button. 3 Select Audio Setup using UP/DOWN buttons, then press the RIGHT or ENTER button. 4 Use the UP/DOWN buttons to select the desired item. Then press the RIGHT or ENTER button. Digital Output 1. PCM : Converts to PCM(2CH) 48kHz audio. Select PCM when using the Analog Audio Outputs. 2. Bitstream : Converts to Dolby Digital Bitstream (5.1CH). Select Bitstream when using the Digital Audio Output. AUDIO SETUP Digital Output : PCM DTS : Off Dynamic Compression : On PCM Down Sampling : On NOTE Be sure to select the correct Digital Output or no audio will be heard. DTS 1. Off : Doesn't output digital signal. 2. On : Outputs DTS Bitstream via digital output only. Select DTS when connecting to a DTS Decoder. Dynamic Compression 1. On : To select dynamic compression. 2. Off : To select the standard range. PCM Down Sampling 1. On : Select this when the amplifier connected to the player is not 96KHz compatible. In this case, the 96KHz signals will be down converted to 48KHZ. 2. Off : Select this when the amplifier connected to the player is 96KHz compatible. In this case, all signals will be output without any changes. NOTE • How to make the SETUP menu disappear or return to menu screen during set up; Press RETURN or LEFT button. • Manufactured under license from Dolby Laboratories. "Dolby" and the double-D symbol are trademarks of Dolby Laboratories. • "DTS" and "DTS Digital Out" are trademarks of Digital Theater Systems, Inc. 41 ADVANCED FUNCTIONS
-
 1
1 -
2
-
3
-
4
-
5
-
6
-
7
-
8
-
9
-
10
-
11
-
12
-
13
-
14
-
15
-
 16
16 -
 17
17 -
 18
18 -
 19
19 -
 20
20 -
 21
21 -
 22
22 -
 23
23 -
 24
24
 |
 |