Samsung DVD-C639P User Manual - Page 8
Choosing a Connection
 |
View all Samsung DVD-C639P manuals
Add to My Manuals
Save this manual to your list of manuals |
Page 8 highlights
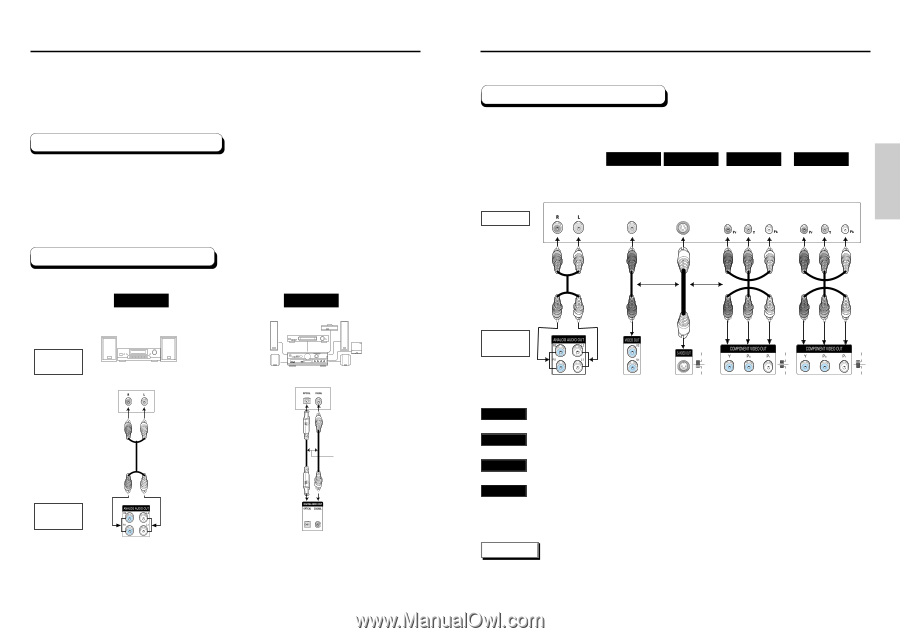
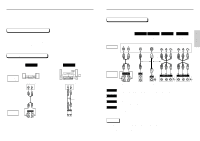
Choosing a Connection The following show examples of connections commonly used to connect the DVD player with a TV and other components. Before Connecting the DVD Player • Always turn off the DVD player, TV, and other components before you connect or disconnect any cables. • Refer to the owner's manual of the additional components you are connecting for more information on those particular components. Connection to an Audio System Method 1 Method 2 AUDIO SYSTEM 2ch Amplifier Audio Input Jacks Dolby Digital Decoder Digital Audio Input Jack DVD PLAYER Analog Audio Out 14 OR Digital Audio Out Choosing a Connection Connection to a TV (For Video) TV (Normal, Widescreen, Projection, etc..) Basic Audio Method 1 Good picture Method 2 Better picture Method 3 Best picture Method 4 Optimum picture TV AV Cable S-Video Cable OR Video Cables OR DVD PLAYER 525P (480P) 525I (480I) S-VIDEO 525P (480P) 525I (480I) S-VIDEO 525P (480P) 525I (480I) S-VIDEO Audio Output Jacks Video Output Jack S-Video Jack Component Video Jacks Component Video Jacks Method 1 Method 2 Method 3 Method 4 DVD Player + TV with Video Input Jack (The VIDEO OUT SELECT switch must be set to the S-VIDEO position.) DVD Player + TV with S-Video Input Jack (The VIDEO OUT SELECT switch must be set to the S-VIDEO position.) DVD Player + TV with Component Video Jacks (The VIDEO OUT SELECT switch must be set to the 525i(480i) position.) DVD Player + TV with Progressive Scan Jacks. (The VIDEO OUT SELECT switch must be set to the 525P(480P) position). • If 525P(480P) VIDEO OUT is selected, VIDEO and S-VIDEO will not work. • Depending on your TV, your hookup for Method 4 may differ from the illustration. NOTE Consult your TV User's Manual to find out if your TV supports Progressive Scan. If Progressive Scan is supported, follow the TV User's Manual's instructions regarding Progressive Scan settings in the TV's menu system. 15 CONNECTIONS
-
 1
1 -
2
-
 3
3 -
 4
4 -
 5
5 -
 6
6 -
 7
7 -
 8
8 -
 9
9 -
 10
10 -
 11
11 -
 12
12 -
 13
13 -
14
-
15
-
16
-
17
-
18
-
19
-
20
-
21
-
22
-
23
-
24
 |
 |