Samsung DVD-HD960 User Manual (ENGLISH) - Page 12
Choosing a Connection
 |
UPC - 036725609600
View all Samsung DVD-HD960 manuals
Add to My Manuals
Save this manual to your list of manuals |
Page 12 highlights
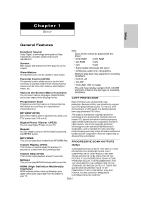
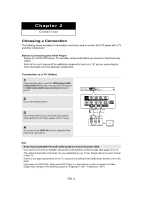
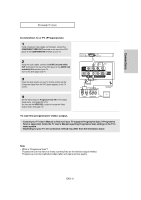
Chapter 2 CONNECTIONS Choosing a Connection The following shows examples of connections commonly used to connect the DVD player with a TV and other components. Before Connecting the DVD Player - Always turn off the DVD player, TV, and other components before you connect or disconnect any cables. - Refer to the user's manual of the additional components (such as a TV) you are connecting for more information on those particular components. Connection to a TV (Video) 1 Using video/audio cables, connect the VIDEO (yellow)/AUDIO (red and white) OUT terminals on the rear of the DVD player to the VIDEO (yellow)/AUDIO (red and white) IN terminals of your TV. 2 Turn on the DVD player and TV. 3 Press the input selector on your TV remote control until the Video signal from the DVD player appears on the TV screen. RED WHITE YELLOW Audio Cable Video Cable RED WHITE YELLOW 4 You can also use the VIDEO SEL. button to change the Video Output mode. (See page 12) Note - Noise may be generated if the audio cable placed too close to the power cable. - If you want to connect to an Amplifier, please refer to the Amplifier connection page. (See pages 18 to 19) - The number and position of terminals may vary depending on your TV set. Please refer to the user's manual of your TV. - If there is one audio input terminal on the TV, connect it to the [AUDIO OUT][left] (white) terminal of the DVD player. - If you press the VIDEO SEL. button when DVD Player is in stop mode or no disc is inserted, the Video Output mode changes in the following sequence: (Progressive : ON ➝ Progressive : OFF). ENG-12
-
 1
1 -
2
-
3
-
4
-
5
-
6
-
 7
7 -
 8
8 -
 9
9 -
 10
10 -
 11
11 -
 12
12 -
 13
13 -
 14
14 -
 15
15 -
 16
16 -
 17
17 -
18
-
19
-
20
-
21
-
22
-
23
-
24
-
25
-
26
-
27
-
28
-
29
-
30
-
31
-
32
-
33
-
34
-
35
-
36
-
37
-
38
-
39
-
40
-
41
-
42
-
43
-
44
-
45
-
46
-
47
-
48
-
49
-
50
-
51
-
52
-
53
-
54
-
55
-
56
-
57
-
58
-
59
-
60
-
61
-
62
-
63
-
64
-
65
-
66
-
67
-
68
-
69
-
70
-
71
-
72
-
73
-
74
-
75
-
76
-
77
-
78
-
79
-
80
-
81
-
82
-
83
-
84
-
85
-
86
-
87
-
88
-
89
-
90
-
91
-
92
-
93
-
94
-
95
-
96
-
97
-
98
-
99
-
100
-
101
-
102
-
103
-
104
-
105
-
106
-
107
-
108
-
109
-
110
-
111
-
112
-
113
-
114
-
115
-
116
-
117
-
118
-
119
-
120
-
121
-
122
-
123
-
124
-
125
-
126
-
127
-
128
 |
 |
