Samsung GT-P5113 User Manual - Page 127
Camcorder Settings, Self-recording, Recording mode, Timer, Effects, Exposure value, Settings
 |
View all Samsung GT-P5113 manuals
Add to My Manuals
Save this manual to your list of manuals |
Page 127 highlights
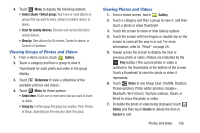
Camcorder Settings Before you start taking videos, use the camcorder settings to configure the camcorder for best results. Camcorder settings are represented by icons on the left side of the screen. Editing Camcorder Settings Shortcuts As with the camera, the first five icons are actually shortcuts to camcorder settings. These five shortcuts can be customized to fit your preference. Self-recording, Recording mode, Timer, Effects, and Exposure value are default settings shortcuts. To customize these shortcuts, see "Editing Camera Settings Shortcuts" on page 118. Configuring Camcorder Settings To configure Camcorder settings: Ⅲ While in Camcorder mode, touch a settings shortcut or touch Settings to configure the following Camcorder settings: • Edit shortcuts: Customize your settings shortcuts. For more information, refer to "Editing Camera Settings Shortcuts" on page 118. • Self-recording: Touch to switch to the front-facing camera lens and record a video of yourself. • Recording mode: Set a recording mode. Options are: Normal and Limit for email, which limits the size of the video to 50 megabytes. • Exposure value: Use the slider to set the exposure value from -2.0 to +2.0. • Timer: Set a timer for how long to wait before recording a video. Options are: Off, 2 sec, 5 sec, and 10 sec. • Effects: Apply an effect to videos. Options are: None, Negative, Black and white, or Sepia. • Resolution: Set a size for the video. Options are: 1280x720, 720x480, 640x480, or 320x240. • White balance: Set the light source. Options are: Auto, Daylight, Cloudy, Incandescent, or Fluorescent. • Guidelines: Enable or disable an on-screen grid to aid in video composition. • Storage: Set whether to store you videos on your device or on your memory card. • Reset: Set all Camera settings to the defaults. Photos and Video 122
-
 1
1 -
2
-
3
-
4
-
5
-
6
-
7
-
8
-
9
-
10
-
11
-
12
-
13
-
14
-
15
-
16
-
17
-
18
-
19
-
20
-
21
-
22
-
23
-
24
-
25
-
26
-
27
-
28
-
29
-
30
-
31
-
32
-
33
-
34
-
35
-
36
-
37
-
38
-
39
-
40
-
41
-
42
-
43
-
44
-
45
-
46
-
47
-
48
-
49
-
50
-
51
-
52
-
53
-
54
-
55
-
56
-
57
-
58
-
59
-
60
-
61
-
62
-
63
-
64
-
65
-
66
-
67
-
68
-
69
-
70
-
71
-
72
-
73
-
74
-
75
-
76
-
77
-
78
-
79
-
80
-
81
-
82
-
83
-
84
-
85
-
86
-
87
-
88
-
89
-
90
-
91
-
92
-
93
-
94
-
95
-
96
-
97
-
98
-
99
-
100
-
101
-
102
-
103
-
104
-
105
-
106
-
107
-
108
-
109
-
110
-
111
-
112
-
113
-
114
-
115
-
116
-
117
-
118
-
119
-
120
-
121
-
 122
122 -
 123
123 -
 124
124 -
 125
125 -
 126
126 -
 127
127 -
 128
128 -
 129
129 -
 130
130 -
 131
131 -
 132
132 -
133
-
134
-
135
-
136
-
137
-
138
-
139
-
140
-
141
-
142
-
143
-
144
-
145
-
146
-
147
-
148
-
149
-
150
-
151
-
152
-
153
-
154
-
155
-
156
-
157
-
158
-
159
-
160
-
161
-
162
-
163
-
164
-
165
-
166
-
167
-
168
-
169
-
170
-
171
-
172
-
173
-
174
-
175
-
176
-
177
-
178
-
179
-
180
-
181
-
182
-
183
-
184
-
185
-
186
-
187
-
188
-
189
-
190
-
191
-
192
-
193
-
194
-
195
-
196
-
197
-
198
-
199
-
200
-
201
-
202
-
203
-
204
-
205
-
206
-
207
-
208
-
209
-
210
-
211
-
212
-
213
-
214
-
215
-
216
-
217
-
218
-
219
-
220
-
221
-
222
-
223
-
224
-
225
-
226
-
227
-
228
-
229
-
230
-
231
-
232
-
233
-
234
-
235
-
236
-
237
-
238
-
239
-
240
-
241
-
242
 |
 |
