Samsung HT-BD7200 User Manual - Page 35
System setup
 |
View all Samsung HT-BD7200 manuals
Add to My Manuals
Save this manual to your list of manuals |
Page 35 highlights
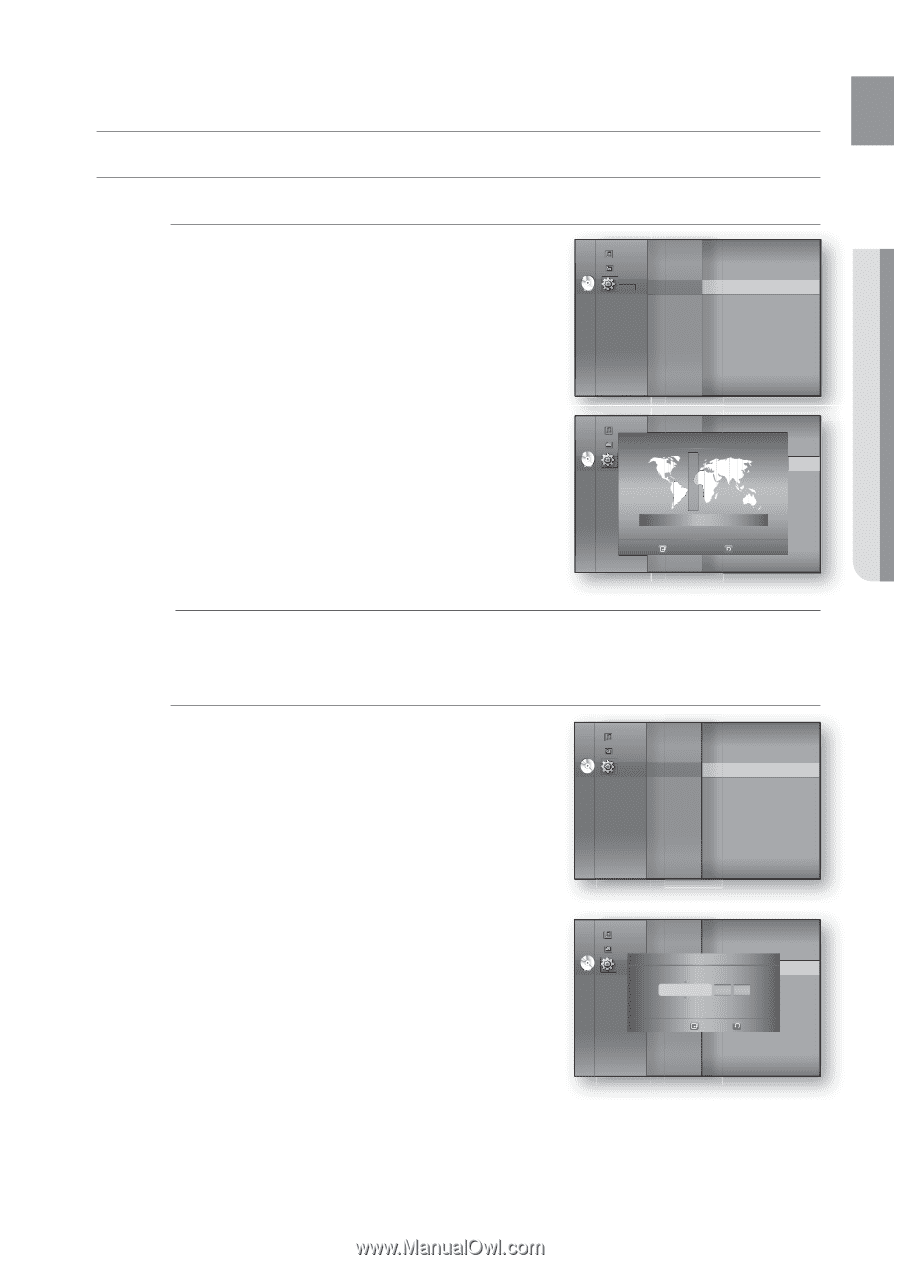
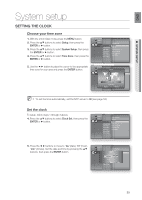
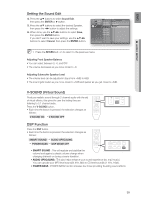
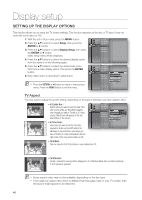
eng ● SySteM Setup System setup Setting the CloCK Choose your time zone 1. With the unit in Stop mode, press the Menu button. Music 2. Press the ▲▼ buttons to select Setup, then press the Photo System Information enteR or ► button. dVd Setup System Setup ◄ Time Zone ► 3. Press the ▲▼ buttons to select System Setup, then press Language Setup Clock Set Audio Setup Power On/Off sound : On the enteR or ► button. Display Setup HDMI Setup BD data management DivX(R) Registration 4. Press the ▲▼ buttons to select time Zone, then press the Network Setup Parental Setup System Update enteR or ► button. 5. Use the ◄ ► button to place the cursor to the appropriate time zone for your area and press the enteR button. Music Photo Time Zone System Information dVd Setup System Setup ◄ Time Zone ► Language Setup Clock Set Audio Setup Power On/Off sound : On Display Setup Touch Key Sound : On HDMI Setup BD Data Management ◄ Network SetupGMT + 0S0y:s0t0em Update ► Parental SetuLopndon, Lisbon Save Return M To set the time automatically, set the NTP server to On (see page 53). Set the clock To setup, follow steps 1 through 3 above. Music 4. Press the ▲▼ buttons to select Clock Set, then press the Photo System Information Time Zone enteR or ► button. dVd Setup System Setup ◄ Clock Set ► Language Setup Audio Setup Display Setup HDMI Setup Power On/Off sound : On BD data management DivX(R) Registration System Update Network Setup Parental Setup 5. Press the ◄ ► buttons to move to "da."(date), "hr" (hour), "min" (minute). Set the date and time by pressing the ▲▼ Music System Information buttons, then press the enteR button. Photo Time Zone Clock Set dVd Setup System Setup ◄ Clock Set ► da. hr. min. Language Setup Power On/Off sound : On Audio SJeAtNu/p01/2009 Touch01Key So0u1nd : On Display STheuturspday BD Data Management HDMI Setup System Update Network Setup Save Return Parental Setup 35
-
 1
1 -
2
-
3
-
4
-
5
-
6
-
7
-
8
-
9
-
10
-
11
-
12
-
13
-
14
-
15
-
16
-
17
-
18
-
19
-
20
-
21
-
22
-
23
-
24
-
25
-
26
-
27
-
28
-
29
-
 30
30 -
 31
31 -
 32
32 -
 33
33 -
 34
34 -
 35
35 -
 36
36 -
 37
37 -
 38
38 -
 39
39 -
 40
40 -
41
-
42
-
43
-
44
-
45
-
46
-
47
-
48
-
49
-
50
-
51
-
52
-
53
-
54
-
55
-
56
-
57
-
58
-
59
-
60
-
61
-
62
-
63
-
64
-
65
-
66
-
67
-
68
-
69
-
70
-
71
-
72
-
73
-
74
-
75
-
76
-
77
-
78
-
79
-
80
-
81
-
82
-
83
-
84
-
85
-
86
-
87
-
88
-
89
-
90
-
91
-
92
-
93
-
94
-
95
-
96
-
97
-
98
-
99
 |
 |