Samsung MX-JS8000 User Manual - Page 7
Rear Panel
 |
View all Samsung MX-JS8000 manuals
Add to My Manuals
Save this manual to your list of manuals |
Page 7 highlights
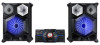
Rear Panel 345 6 7 8 02 Getting Started 12 RADIO Antenna Terminals 1. Connect the FM/AM antenna to the 1 FM/AM antenna connector terminal. 2. Slowly move the antenna wire until you find a location where reception is good, then fasten it to a wall or other rigid surface. AUX IN 2 Terminals 1. Use an Audio Cable (not supplied) to connect AUX IN 2 on the main unit to Audio Out on an external analog output device. • Be sure to match connector colors. • If the external analog output device has 2 only one Audio Out jack, connect either left or right. • Press the AUX 1/2 button to select AUX 2. • If the product is in AUX mode for more than eight hours and no buttons on the front panel or remote are pushed, the system will turn off. AUX IN 1 Terminals 1. Use to connect an external device such as an MP3 player. 3 • Connect AUX IN 1 on the rear panel of the main unit to the Audio Out of an external device/MP3 player. • Press the AUX 1/2 button to select AUX1. 4 LED Terminals for Speaker Beat Waving. ONLY FOR SERVICE 5 • This jack is for testing only. Please do not use. 2.2 CH Speaker Terminals 1. To achieve the correct sound quality, when you connect the speakers, match the color of the speaker plugs to the 6 color of the speaker jacks. See below. • LEFT channel (marked , White/Purple). • RIGHT channel (marked , Red/Purple). • Don't force the Purple SUBWOOFER connector into the White or Red speaker jack. Cooling fan • The fan operates while the unit is powered on. 7 If you set the unit to the minimum volume, the fan won't operate. Secure a minimum 6 inches (15 cm) of clear space on all sides of the fan when installing the main unit. POWER 8 • Insert only the provided power cable. [MX-JS8000-ZP]AH68-02771H-00ENG.indd 7 7 English 2015-03-31 오전 9:18:10
-
 1
1 -
 2
2 -
 3
3 -
 4
4 -
 5
5 -
 6
6 -
 7
7 -
 8
8 -
 9
9 -
 10
10 -
 11
11 -
 12
12 -
13
-
14
-
15
-
16
-
17
-
18
-
19
-
20
-
21
-
22
-
23
-
24
-
25
-
26
-
27
-
28
-
29
-
30
-
31
-
32
-
33
-
34
-
35
-
36
-
37
-
38
-
39
-
40
-
41
-
42
-
43
-
44
-
45
-
46
-
47
-
48
-
49
-
50
-
51
-
52
-
53
-
54
-
55
-
56
-
57
-
58
-
59
-
60
-
61
-
62
 |
 |
