Samsung NV3S User Manual - Page 54
On Screen Display information, DPOF : Print size
 |
View all Samsung NV3S manuals
Add to My Manuals
Save this manual to your list of manuals |
Page 54 highlights
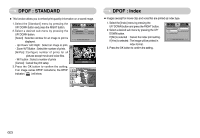
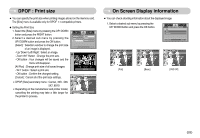
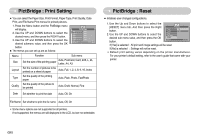
◀▶ DPOF : Print size ■ You can specify the print size when printing images stored on the memory card. The [Size] menu is available only for DPOF 1.1 compatible printers. ● Setting the Print Size 1. Select the [Size] menu by pressing the UP/ DOWN button and press the RIGHT button. 2. Select a desired sub menu by pressing the UP/ DOWN button and press the OK button. [Select] : Selection window to change the print size of an image is displayed. - Up/ Down/ Left/ Right : Select an image. - Zoom W/T Button : Change the print size. - OK button : Your changes will be saved and the menu will disappear. [All Pics] : Change print size of all saved images. - W/ T button : Select a print size - OK button : Confirm the changed setting. [Cancel] : Cancel all of the print size settings. ※ DPOF [Size] secondary menu : Cancel, 3X5, 4X6, 5X7, 8X10 ※ Depending on the manufacturer and printer model, cancelling the printing may take a little longer for the printer to process. Standard Index Size DPOF Select All Pics Cancel Back:◀ Set:OK W◀ Cancel ▶T Set:OK W◀ Cancel ▶T Set:OK On Screen Display information ■ You can check shooting information about the displayed image. 1. Select a desired sub menu by pressing the UP/ DOWN button and press the OK button. OSD INFORMATION Full Basic OSD Off Exit:MENU Move: ISO : 100 Av : F3.5 Tv : 1/60 Flash : Off 3072x2304 2006/07/01 [Full] [Basic] [OSD Off] 《53》
-
 1
1 -
2
-
3
-
4
-
5
-
6
-
7
-
8
-
9
-
10
-
11
-
12
-
13
-
14
-
15
-
16
-
17
-
18
-
19
-
20
-
21
-
22
-
23
-
24
-
25
-
26
-
27
-
28
-
29
-
30
-
31
-
32
-
33
-
34
-
35
-
36
-
37
-
38
-
39
-
40
-
41
-
42
-
43
-
44
-
45
-
46
-
47
-
48
-
 49
49 -
 50
50 -
 51
51 -
 52
52 -
 53
53 -
 54
54 -
 55
55 -
 56
56 -
 57
57 -
 58
58 -
 59
59 -
60
-
61
-
62
-
63
-
64
-
65
-
66
-
67
-
68
-
69
-
70
-
71
-
72
-
73
-
74
-
75
-
76
-
77
-
78
-
79
-
80
-
81
-
82
-
83
-
84
-
85
-
86
-
87
-
88
-
89
-
90
-
91
-
92
-
93
-
94
 |
 |
