Samsung PN50C430A1D User Manual (user Manual) (ver.1.0) (English) - Page 15
Advanced Settings, Picture Options, P.SIZE
 |
View all Samsung PN50C430A1D manuals
Add to My Manuals
Save this manual to your list of manuals |
Page 15 highlights
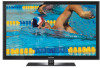
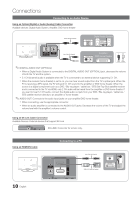
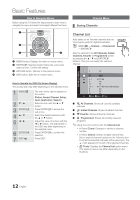
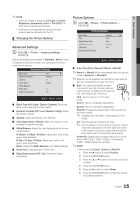
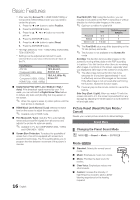
03 Basic Features ✎✎NOTE xx When you make changes to Cell Light, Contrast, Brightness, Sharpness, Color or Tint (G/R), the OSD will be adjusted accordingly. xx Settings can be adjusted and stored for each external device connected to the TV. ¦¦ Changing the Picture Options Advanced Settings OO MENUm → Picture → Advanced Settings → ENTERE (Advanced Settings are available in Standard / Movie mode) Compared to previous models, new Samsung TVs have a more precise picture. Advanced Settings Black Tone Dynamic Contrast Gamma Color Space White Balance Flesh Tone Edge Enhancement : Off ► : Medium : 0 : Native : 0 : On U Move E Enter R Return ■■ Black Tone (Off / Dark / Darker / Darkest): Select the black level to adjust the screen depth. ■■ Dynamic Contrast (Off / Low / Medium / High): Adjust the screen contrast. ■■ Gamma: Adjust the primary color intensity. ■■ Color Space (Auto / Native): Adjust the range of colors available to create the image. ■■ White Balance: Adjust the color temperature for a more natural picture. R-Offset / G-Offset / B-Offset: Adjust each color's (red, green, blue) darkness. R-Gain / G-Gain / B-Gain: Adjust each color's (red, green, blue) brightness. Reset: Resets the White Balance to it's default settings. ■■ Flesh Tone: Emphasize pink "Flesh Tone." ■■ Edge Enhancement (Off / On): Emphasize object boundaries. Picture Options OO MENUm → Picture → Picture Options → ENTERE Picture Options Color Tone Size Digital Noise Filter HDMI Black Level Film Mode Screen Burn Protection : Normal ► : 16:9 : Auto : Normal : Off U Move E Enter R Return ■■ Color Tone (Cool / Normal / Warm1 / Warm2) ✎✎Warm1 or Warm2 will be deactivated when the picture mode is Dynamic or Standard. ✎✎Settings can be adjusted and stored for each external device connected to an input on the TV. ■■ Size: Your cable box/satellite receiver may have its own set of screen sizes as well. However, we highly recommend you use 16:9 mode most of the time. P.SIZE 16:9 : Sets the picture to 16:9 wide mode. Zoom1: Use for moderate magnification. Zoom2: Use for a stronger magnification. Wide Fit: Enlarges the aspect ratio of the picture to fit the entire screen. ✎✎ Available with HD 1080i / 720p signals in 16:9 mode. 4:3 : Sets the picture to basic (4:3) mode. ✎✎ Do not watch in 4:3 format for a long time. Traces of borders displayed on the left, right and center of the screen may cause image retention(screen burn) which are not covered by the warranty. Screen Fit: Displays the full image without any cut-off when HDMI (720p / 1080i / 1080p) or Component (1080i / 1080p) signals are inputted. ✎✎NOTE xx After selecting Zoom1, Zoom2 or Wide Fit: 1. Press the ► button to select Position. 2. Press the ENTERE button. 3. Press the ▲ or ▼ button to move the picture up or down. 4. Press the ENTERE button. 5. Press the ► button to select Reset. 6. Press the ENTERE button to reset the picture to its default position. 15 English
-
 1
1 -
2
-
3
-
4
-
5
-
6
-
7
-
8
-
9
-
 10
10 -
 11
11 -
 12
12 -
 13
13 -
 14
14 -
 15
15 -
 16
16 -
 17
17 -
 18
18 -
 19
19 -
 20
20 -
21
-
22
-
23
-
24
-
25
-
26
-
27
-
28
-
29
-
30
-
31
-
32
-
33
-
34
-
35
-
36
-
37
-
38
 |
 |