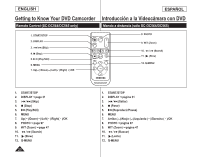
Samsung SC-DC564 Quick Guide (easy Manual) (ver.1.0) (English) - Page 22
Installing the Lithium Battery in the Remote Control SC-DC564/DC565 only
 |
UPC - 036725301542
View all Samsung SC-DC564 manuals
Add to My Manuals
Save this manual to your list of manuals |
Page 22 highlights
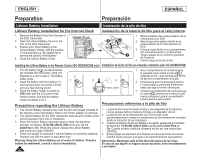
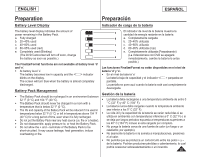
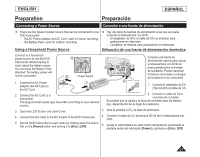
ENGLISH ESPAÑOL Preparation Preparación Lithium Battery Installation Instalación de la pila de litio Lithium Battery Installation for the Internal Clock Instalación de la batería de litio para el reloj interno 1. Remove the Battery Pack from the rear of the DVD Camcorder. 2. Open the Lithium Battery Cover on the rear of the DVD Camcorder. 3. Position the Lithium Battery in the Lithium Battery Holder, with the positive (+) terminal face up. Be careful not to reverse the polarity of the Battery. 4. Close the Lithium Battery Cover. 1. Retire la batería de la parte posterior de la Videocámara con DVD. 2. Abra la tapa de la batería de litio en la parte posterior de la Videocámara con DVD. 3. Coloque la pila de litio en su compartimento, con el terminal positivo (+) hacia arriba. Tenga cuidado de no invertir la polaridad de la batería. 4. Cierre la tapa de la pila de litio Installing the Lithium Battery in the Remote Control (SC-DC564/DC565 only) Instalación de la pila de litio en el mando a distancia (sólo SC-DC564/DC565) 1. Turn the battery holder counterclockwise (as indicated with [ ] mark), using your fingernail or a coin to open it. The battery holder opens. 2. Insert the battery with the positive (+) 1 2 terminal face down and press it firmly until you hear locking sound. 3. Place the battery holder to match its [ ] mark with the [] mark on the remote control, and turn the battery holder clockwise to fix it. Precautions regarding the Lithium Battery 1. The Lithium Battery maintains the clock function and preset contents of the memory; even if the Battery Pack or AC Power adapter is removed. 2. The Lithium Battery for the DVD Camcorder lasts about 6 months under normal operation from time of installation. 3. When the Lithium Battery becomes weak or dead, the date/time indicator will display 12:00 AM JAN.01.2006 when you set the Date/Time to On. When this occurs, replace the Lithium Battery with a new one (type CR2025). 4. There is a danger of explosion if Lithium Battery is incorrectly replaced. Replace only with the same or equivalent type. Warning: Keep the Lithium Battery out of reach of children. Should a battery be swallowed, consult a doctor immediately. 22 3 Battery Holder 1. Gire el compartimento de la batería hacia la izquierda (como indica la marca [ ]), utilizando la uña o una moneda para abrirlo. Se abrirá el compartimento de la pila. 2. Introduzca la pila con el terminal positivo (+) hacia abajo y presiónela firmemente hasta que oiga un sonido de bloqueo. 3. Coloque el compartimento de la pila para que su marca [ ] coincida con la marca [] del mando a distancia y gire el compartimento hacia la derecha para cerrarlo. Precauciones referentes a la pila de litio 1. La pila de litio hace funcionar el reloj y los preajustes de la memoria, incluso aunque retire la batería principal o el adaptador de CA. 2. La pila de litio de la Videocámara con DVD puede durar aproximadamente 6 meses en condiciones de funcionamiento normales desde el momento de su instalación. 3. Cuando la batería de litio se debilita o se agota, aparecerá el indicador de fecha/hor 12:00 AM JAN.01.2006 cuando defina Date/Time en On. Cuando suceda, sustituya la batería de litio por una nueva (tipo CR2025). 4. Existe peligro de explosión si la batería se coloca de forma incorrecta. Cambie la pila sólo por una igual o de especificaciones equivalentes. Advertencia: Mantenga la pila de litio fuera del alcance de los niños. En caso de que alguien se tragara una por accidente, avise inmediatamente a un médico.
-
 1
1 -
2
-
3
-
4
-
5
-
6
-
7
-
8
-
9
-
10
-
11
-
12
-
13
-
14
-
15
-
16
-
 17
17 -
 18
18 -
 19
19 -
 20
20 -
 21
21 -
 22
22 -
 23
23 -
 24
24 -
 25
25 -
 26
26 -
 27
27 -
28
-
29
-
30
-
31
-
32
-
33
-
34
-
35
-
36
-
37
-
38
-
39
-
40
-
41
-
42
-
43
-
44
-
45
-
46
-
47
-
48
-
49
-
50
-
51
-
52
-
53
-
54
-
55
-
56
-
57
-
58
-
59
-
60
-
61
-
62
-
63
-
64
-
65
-
66
-
67
-
68
-
69
-
70
-
71
-
72
-
73
-
74
-
75
-
76
-
77
-
78
-
79
-
80
-
81
-
82
-
83
-
84
-
85
-
86
-
87
-
88
-
89
-
90
-
91
-
92
-
93
-
94
-
95
-
96
-
97
-
98
-
99
-
100
-
101
-
102
-
103
-
104
-
105
-
106
-
107
-
108
-
109
-
110
-
111
-
112
-
113
-
114
-
115
-
116
-
117
-
118
-
119
-
120
-
121
-
122
-
123
-
124
-
125
-
126
-
127
-
128
-
129
-
130
-
131
-
132
 |
 |
