Samsung SCD6040 User Manual (user Manual) (ver.1.0) (English) - Page 146
Printing Your Pictures - Using the DPOF Digital Print Order Format
 |
View all Samsung SCD6040 manuals
Add to My Manuals
Save this manual to your list of manuals |
Page 146 highlights
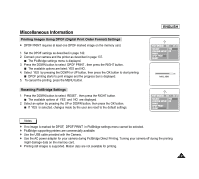
ENGLISH Miscellaneous Information PreinctainugtioYnosuroPnicCtaumrecso-rdUesr iCngartehe DPOF (Digital Print Order Format) ✤ Mark your images with DPOF (Digital Print Order Format) marking to utilize automatic printing. ✤ DPOF menu only works in (CAMERA) s PLAY mode. ✤ You can mark your images with DPOF in 3 ways: STANDARD, INDEX and PRINT SIZE. Before you begin! ✤ Turn your camera on by setting the Power Switch to ✤ Set the Mode Dial to PLAY mode. (CAMERA) mode. Standard DPOF Setup 1. Press the MENU button, then select (DPOF) by using the LEFT and RIGHT button. Submenu including STANDARD is displayed. 2. Press the DOWN or UP button to select STANDARD , then press the RIGHT button. The available options of SELECT and ALL PICs are displayed. 3. Select an option by pressing the DOWN or UP button, then press the OK button. 4. If SELECT is selected, multiple pictures screen is displayed and the current selection is highlighted with a yellow outline. To set the DPOF print selection, press the MENU button. To change the number of copies, use the Zoom Lever to set the quantity. Print mark and selected number of copies are displayed. To cancel the selection, press the MENU button again while it is hghlighted in a yellow outline. To exit the selection screen, press the OK button. 5. Press the OK button to set your choice and and exit the multiple pictures screen. If ALL PICs is selected, number of prints setting menu is displayed. Press the UP or DOWN button to set the number of prints. To exit the multiple pictures screen, press the OK button. To cancel your selection made, select CANCEL from the DPOF menu, then press the RIGHT button. The available options of STANDARD , INDEX , and PRINT SIZE are available. Select STANDARD , then press the OK button to cancel your selection. 142 ENGLISH
-
 1
1 -
2
-
3
-
4
-
5
-
6
-
7
-
8
-
9
-
10
-
11
-
12
-
13
-
14
-
15
-
16
-
17
-
18
-
19
-
20
-
21
-
22
-
23
-
24
-
25
-
26
-
27
-
28
-
29
-
30
-
31
-
32
-
33
-
34
-
35
-
36
-
37
-
38
-
39
-
40
-
41
-
42
-
43
-
44
-
45
-
46
-
47
-
48
-
49
-
50
-
51
-
52
-
53
-
54
-
55
-
56
-
57
-
58
-
59
-
60
-
61
-
62
-
63
-
64
-
65
-
66
-
67
-
68
-
69
-
70
-
71
-
72
-
73
-
74
-
75
-
76
-
77
-
78
-
79
-
80
-
81
-
82
-
83
-
84
-
85
-
86
-
87
-
88
-
89
-
90
-
91
-
92
-
93
-
94
-
95
-
96
-
97
-
98
-
99
-
100
-
101
-
102
-
103
-
104
-
105
-
106
-
107
-
108
-
109
-
110
-
111
-
112
-
113
-
114
-
115
-
116
-
117
-
118
-
119
-
120
-
121
-
122
-
123
-
124
-
125
-
126
-
127
-
128
-
129
-
130
-
131
-
132
-
133
-
134
-
135
-
136
-
137
-
138
-
139
-
140
-
 141
141 -
 142
142 -
 143
143 -
 144
144 -
 145
145 -
 146
146 -
 147
147 -
 148
148 -
 149
149 -
 150
150 -
 151
151 -
152
-
153
-
154
-
155
-
156
-
157
-
158
-
159
-
160
-
161
-
162
-
163
-
164
-
165
-
166
-
167
-
168
-
169
 |
 |
