Samsung SCH-N150LV User Manual (user Manual) (ver.3.0) (English) - Page 51
Adding a name, Adding a relation label, a number in the Phone Book.
 |
View all Samsung SCH-N150LV manuals
Add to My Manuals
Save this manual to your list of manuals |
Page 51 highlights
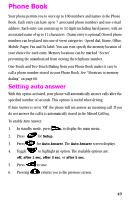
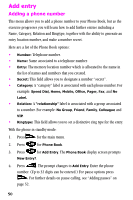
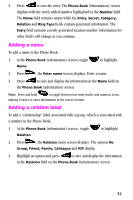
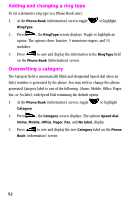
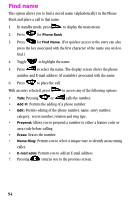
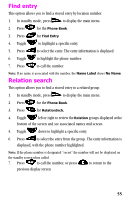
5. Press to save the entry. The Phone Book (Information) screen displays with the newly added number highlighted in the Number field. The Name field remains empty while the Entry, Secret, Category, Relation and Ring Type fields contain generated information. The Entry field contains a newly generated location number. Information for other field's will change as you continue. Adding a name To add a name to the Phone Book: 1. At the Phone Book (information) screen, toggle Name. to highlight 2. Press , the Enter name screen displays. Enter a name. 3. Press to save and display the information in the Name field on the Phone Book (information) screen. Note: Press and hold to toggle between text entry modes and numeric icons, making it easier to enter information in the correct format. Adding a relation label To add a "relationship" label associated with a group, which is associated with a number in the Phone Book. 1. At the Phone Book (information) screen, toggle Relation. to highlight 2. Press , the Relation menu screen displays. The options No Group, Friend, Family, Colleague and VIP display. 3. Highlight an option and press to save and display the information in the Relation field on the Phone Book (information) screen. 51
-
 1
1 -
2
-
3
-
4
-
5
-
6
-
7
-
8
-
9
-
10
-
11
-
12
-
13
-
14
-
15
-
16
-
17
-
18
-
19
-
20
-
21
-
22
-
23
-
24
-
25
-
26
-
27
-
28
-
29
-
30
-
31
-
32
-
33
-
34
-
35
-
36
-
37
-
38
-
39
-
40
-
41
-
42
-
43
-
44
-
45
-
 46
46 -
 47
47 -
 48
48 -
 49
49 -
 50
50 -
 51
51 -
 52
52 -
 53
53 -
 54
54 -
 55
55 -
 56
56 -
57
-
58
-
59
-
60
-
61
-
62
-
63
-
64
-
65
-
66
-
67
-
68
-
69
-
70
-
71
-
72
-
73
-
74
-
75
-
76
-
77
-
78
-
79
-
80
-
81
-
82
-
83
-
84
-
85
-
86
-
87
-
88
-
89
-
90
-
91
-
92
-
93
-
94
-
95
-
96
-
97
-
98
-
99
-
100
-
101
-
102
-
103
-
104
-
105
-
106
-
107
-
108
-
109
-
110
-
111
-
112
-
113
-
114
-
115
-
116
-
117
-
118
-
119
-
120
-
121
-
122
-
123
-
124
-
125
-
126
-
127
-
128
-
129
-
130
-
131
-
132
-
133
-
134
-
135
-
136
-
137
-
138
-
139
-
140
-
141
-
142
-
143
-
144
-
145
-
146
-
147
-
148
-
149
-
150
-
151
-
152
-
153
-
154
 |
 |
