Samsung SCH-U460 User Manual (user Manual) (ver.f8) (English) - Page 71
Creating and Sending Picture Messages
 |
View all Samsung SCH-U460 manuals
Add to My Manuals
Save this manual to your list of manuals |
Page 71 highlights
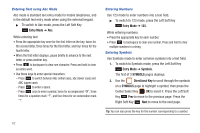
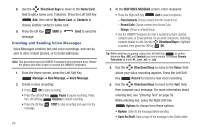
• Cancel Message: Cancel the message, with the option to save it in the Drafts folder. 5. Press the OK Key SEND, or Send to send the message. Creating and Sending Picture Messages Note: Picture messaging is only available in the Verizon Wireless Enhanced Services Area. Picture Messages combine text, pictures, and sound, and can be sent to other mobile phones, to Email addresses, to your Online Album, or to a blog. Picture Messaging is also known as MMS (Multimedia Messaging Service). Note: This procedure uses the QWERTY keyboard and command keys. Rotate the phone and slide it open to access the QWERTY keyboard. 1. From the Home screen, press the Left Soft Key Message, ➔ New Message ➔ Picture Message. Tip: Sliding the phone open immediately after taking a picture opens a New Picture Message. 2. At the NEW PICTURE MESSAGE screen, enter recipients: 66 • Press the Right Soft Key Add to select recipients from: - From Contacts: Choose contacts from the Contacts List. - Recent Calls: Choose numbers from Recent Calls. - Groups: Choose a contacts Group. - To Online Album: Send the message to your Online Album. - To Blogs: Send to a blog. • Use the QWERTY keyboard to enter a recipient's phone number, contact name, or Email address. As you enter characters, matching contacts display in a list. Use the Directional Keys to highlight a contact, then press the OK Key OK. Tip: While entering recipients into the To: field, press the Left Soft Key to switch between Abc, ABC and Symbols text entry modes, or choose Domain Extensions to insert @, .com, .net, or .edu. 3. Use the Directional Keys to move to the Slides field. Pictures you attach are placed on Slides. Use the Directional Keys to navigate between slides, or press the Right Soft Key Options to choose Add Slide. 4. Use the Directional Keys to move to the Text: field, then compose your message. For more information about entering text, see "Entering Text" on page 59. While entering text, press the Right Soft Key Options for these options:
-
 1
1 -
2
-
3
-
4
-
5
-
6
-
7
-
8
-
9
-
10
-
11
-
12
-
13
-
14
-
15
-
16
-
17
-
18
-
19
-
20
-
21
-
22
-
23
-
24
-
25
-
26
-
27
-
28
-
29
-
30
-
31
-
32
-
33
-
34
-
35
-
36
-
37
-
38
-
39
-
40
-
41
-
42
-
43
-
44
-
45
-
46
-
47
-
48
-
49
-
50
-
51
-
52
-
53
-
54
-
55
-
56
-
57
-
58
-
59
-
60
-
61
-
62
-
63
-
64
-
65
-
 66
66 -
 67
67 -
 68
68 -
 69
69 -
 70
70 -
 71
71 -
 72
72 -
 73
73 -
 74
74 -
 75
75 -
 76
76 -
77
-
78
-
79
-
80
-
81
-
82
-
83
-
84
-
85
-
86
-
87
-
88
-
89
-
90
-
91
-
92
-
93
-
94
-
95
-
96
-
97
-
98
-
99
-
100
-
101
-
102
-
103
-
104
-
105
-
106
-
107
-
108
-
109
-
110
-
111
-
112
-
113
-
114
-
115
-
116
-
117
-
118
-
119
-
120
-
121
-
122
-
123
-
124
-
125
-
126
-
127
-
128
-
129
-
130
-
131
-
132
-
133
-
134
-
135
-
136
-
137
-
138
-
139
-
140
-
141
-
142
-
143
-
144
-
145
-
146
-
147
-
148
-
149
-
150
-
151
-
152
-
153
-
154
-
155
-
156
-
157
-
158
-
159
-
160
-
161
-
162
-
163
-
164
-
165
-
166
-
167
-
168
-
169
-
170
-
171
-
172
-
173
-
174
-
175
-
176
-
177
-
178
-
179
-
180
-
181
-
182
-
183
-
184
-
185
-
186
-
187
-
188
-
189
-
190
-
191
-
192
-
193
 |
 |
