Samsung SGH-X426 User Manual (user Manual) (ver.1.0) (English) - Page 77
Creating a Message Using the Options
 |
View all Samsung SGH-X426 manuals
Add to My Manuals
Save this manual to your list of manuals |
Page 77 highlights
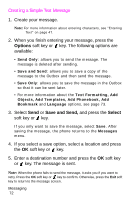
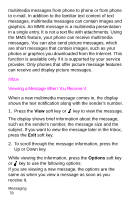
Creating a Message Using the Options 1. Create your message. 2. Press the Options soft key or key. 3. Select one of the following options by using the Up and Down keys and pressing the Select soft key or key. • Text Formatting: allows you to format the style of the text. • For the Size attribute, Normal, Large and Small sizes are available. For the Underline and Strikethrough attributes, select On or Off. The attributes can be combined. • Add Objects: allows you to add a sound, melody, picture or animated image to your message. Select the category of the item to be added. In each category, you can select from the various factory-set items or choose an item received from other sources, such as the Internet or other phones. • Add Templates: allows you to apply one of the preset message templates to the text. Select one of the five messages stored in the Templates menu. For further details, see page 74. • Add Phonebook: allows you to add a Phonebook entry to your message. Select one from the list. • Add Bookmark: allows you to add a web page's address stored in your Favorite list. Select one from the list. • Language: allows you to change the language to be used in T9 input mode. Select the language to be used. 4. Complete the message, and send or save it by following the procedure from step 2 on page 72. Messaging 73
-
 1
1 -
2
-
3
-
4
-
5
-
6
-
7
-
8
-
9
-
10
-
11
-
12
-
13
-
14
-
15
-
16
-
17
-
18
-
19
-
20
-
21
-
22
-
23
-
24
-
25
-
26
-
27
-
28
-
29
-
30
-
31
-
32
-
33
-
34
-
35
-
36
-
37
-
38
-
39
-
40
-
41
-
42
-
43
-
44
-
45
-
46
-
47
-
48
-
49
-
50
-
51
-
52
-
53
-
54
-
55
-
56
-
57
-
58
-
59
-
60
-
61
-
62
-
63
-
64
-
65
-
66
-
67
-
68
-
69
-
70
-
71
-
 72
72 -
 73
73 -
 74
74 -
 75
75 -
 76
76 -
 77
77 -
 78
78 -
 79
79 -
 80
80 -
 81
81 -
 82
82 -
83
-
84
-
85
-
86
-
87
-
88
-
89
-
90
-
91
-
92
-
93
-
94
-
95
-
96
-
97
-
98
-
99
-
100
-
101
-
102
-
103
-
104
-
105
-
106
-
107
-
108
-
109
-
110
-
111
-
112
-
113
-
114
-
115
-
116
-
117
-
118
-
119
-
120
-
121
-
122
-
123
-
124
-
125
-
126
-
127
-
128
-
129
-
130
-
131
-
132
-
133
-
134
-
135
-
136
-
137
-
138
-
139
-
140
-
141
-
142
-
143
-
144
-
145
-
146
-
147
-
148
-
149
-
150
-
151
-
152
-
153
-
154
-
155
-
156
-
157
-
158
-
159
-
160
-
161
-
162
-
163
-
164
-
165
-
166
-
167
-
168
-
169
-
170
-
171
-
172
-
173
-
174
-
175
-
176
-
177
-
178
-
179
-
180
-
181
-
182
-
183
-
184
-
185
-
186
-
187
-
188
-
189
-
190
 |
 |