Samsung SPH-I325 User Manual (user Manual) (ver.f18) (English) - Page 123
H. Using the microSD Card, Ringtones, Notes, and Templates. These folders
 |
View all Samsung SPH-I325 manuals
Add to My Manuals
Save this manual to your list of manuals |
Page 123 highlights
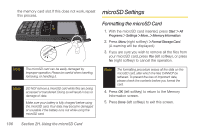
microSD + 3. Connect the other end of the cable to your computer. 4. Plug one end of the included USB cable into your Power/Accessory Interface connection located on the side of the device. (Wait for the connection to be completed. When connected, your computer will automatically detect your device.) Correct Incorrect 5. If ActiveSync was previously installed on your computer, the application will prompt you to configure the new connection profile. For now, click Cancel and close the application. Setup and configuration of ActiveSync is covered in a later section (page 144). 6. Click the My Computer icon on the Windows desktop, and double-click Mobile Device (which may appear as an icon or text, depending on your View settings). Ⅲ A window opens showing a My Windows MobileBased Device icon and additional folders which comprise your device's My Documents folder. This folder may contain subfolders for My Pictures, My Ringtones, Notes, and Templates. These folders must not be modified or deleted. Ⅲ The My Documents directory (Start > All Programs > File Explorer > Menu [right softkey] > My Documents) provides access to only those folders available on the device and not on the microSD card. 7. Double-click the My Windows Mobile-Based Device icon to reveal all the device contents (both storage card and internal device folders). Ⅲ My Documents contains all the built-in device folders that are part of the My Documents group. Section 2H. Using the microSD Card 109
-
 1
1 -
2
-
3
-
4
-
5
-
6
-
7
-
8
-
9
-
10
-
11
-
12
-
13
-
14
-
15
-
16
-
17
-
18
-
19
-
20
-
21
-
22
-
23
-
24
-
25
-
26
-
27
-
28
-
29
-
30
-
31
-
32
-
33
-
34
-
35
-
36
-
37
-
38
-
39
-
40
-
41
-
42
-
43
-
44
-
45
-
46
-
47
-
48
-
49
-
50
-
51
-
52
-
53
-
54
-
55
-
56
-
57
-
58
-
59
-
60
-
61
-
62
-
63
-
64
-
65
-
66
-
67
-
68
-
69
-
70
-
71
-
72
-
73
-
74
-
75
-
76
-
77
-
78
-
79
-
80
-
81
-
82
-
83
-
84
-
85
-
86
-
87
-
88
-
89
-
90
-
91
-
92
-
93
-
94
-
95
-
96
-
97
-
98
-
99
-
100
-
101
-
102
-
103
-
104
-
105
-
106
-
107
-
108
-
109
-
110
-
111
-
112
-
113
-
114
-
115
-
116
-
117
-
 118
118 -
 119
119 -
 120
120 -
 121
121 -
 122
122 -
 123
123 -
 124
124 -
 125
125 -
 126
126 -
 127
127 -
 128
128 -
129
-
130
-
131
-
132
-
133
-
134
-
135
-
136
-
137
-
138
-
139
-
140
-
141
-
142
-
143
-
144
-
145
-
146
-
147
-
148
-
149
-
150
-
151
-
152
-
153
-
154
-
155
-
156
-
157
-
158
-
159
-
160
-
161
-
162
-
163
-
164
-
165
-
166
-
167
-
168
-
169
-
170
-
171
-
172
-
173
-
174
-
175
-
176
-
177
-
178
-
179
-
180
-
181
-
182
-
183
-
184
-
185
-
186
-
187
-
188
-
189
-
190
-
191
-
192
-
193
-
194
-
195
-
196
-
197
-
198
-
199
-
200
-
201
-
202
-
203
-
204
-
205
-
206
-
207
-
208
-
209
-
210
-
211
-
212
-
213
-
214
-
215
-
216
-
217
-
218
-
219
-
220
-
221
-
222
-
223
-
224
-
225
-
226
-
227
 |
 |
