Samsung SPH-I325 User Manual (user Manual) (ver.f18) (English) - Page 159
Installing ActiveSync on Your Computer, Synchronization Overview - smartphone
 |
View all Samsung SPH-I325 manuals
Add to My Manuals
Save this manual to your list of manuals |
Page 159 highlights
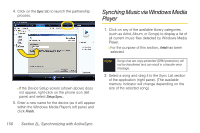
Synchronization Installing ActiveSync on Your Computer 1. Insert the Software Installation CD into your computer's disc drive. 2. Click the Setup and Installation link from the onscreen disc menu. 3. Click the Install button to begin the installation of the ActiveSync application to your computer. Ⅲ You can also download the latest version of Microsoft® ActiveSync from the Microsoft site at: http://www.microsoft.com/windowsmobile/en-us/help/ synchronize/device-synch.mspx. Note If the ActiveSync option is grayed out, you may have the application already installed. It is recommended that you uninstall any previous version prior to completing this new installation. 4. Launch the setup program and follow the onscreen instructions. At the end of the installation process, you will see an ActiveSync icon in your taskbar. Ⅲ Synchonization will begin automatically the first time your device is connected to your computer. Ⅲ All selected synchronization items will be copied from your computer to your device and Windows Explorer will create a shortcut to the Mobile drive. Synchronization Overview Once you begin the synchronization process (by connecting your device to your computer) the Microsoft ActiveSync window should automatically open. Your device will remain connected to the computer after synchronization is complete. If any selected content is changed on your computer (new email, photos, playlist updates, etc.) Microsoft ActiveSync automatically resyncs the information on the device. You can open the device's file directory in ActiveSync on your computer by clicking Tools > Explore Smartphone from the ActiveSync main menu. You can then copy files quickly and easily from the device to the computer, or vice versa. Section 2L. Synchronizing with ActiveSync 145
-
 1
1 -
2
-
3
-
4
-
5
-
6
-
7
-
8
-
9
-
10
-
11
-
12
-
13
-
14
-
15
-
16
-
17
-
18
-
19
-
20
-
21
-
22
-
23
-
24
-
25
-
26
-
27
-
28
-
29
-
30
-
31
-
32
-
33
-
34
-
35
-
36
-
37
-
38
-
39
-
40
-
41
-
42
-
43
-
44
-
45
-
46
-
47
-
48
-
49
-
50
-
51
-
52
-
53
-
54
-
55
-
56
-
57
-
58
-
59
-
60
-
61
-
62
-
63
-
64
-
65
-
66
-
67
-
68
-
69
-
70
-
71
-
72
-
73
-
74
-
75
-
76
-
77
-
78
-
79
-
80
-
81
-
82
-
83
-
84
-
85
-
86
-
87
-
88
-
89
-
90
-
91
-
92
-
93
-
94
-
95
-
96
-
97
-
98
-
99
-
100
-
101
-
102
-
103
-
104
-
105
-
106
-
107
-
108
-
109
-
110
-
111
-
112
-
113
-
114
-
115
-
116
-
117
-
118
-
119
-
120
-
121
-
122
-
123
-
124
-
125
-
126
-
127
-
128
-
129
-
130
-
131
-
132
-
133
-
134
-
135
-
136
-
137
-
138
-
139
-
140
-
141
-
142
-
143
-
144
-
145
-
146
-
147
-
148
-
149
-
150
-
151
-
152
-
153
-
 154
154 -
 155
155 -
 156
156 -
 157
157 -
 158
158 -
 159
159 -
 160
160 -
 161
161 -
 162
162 -
 163
163 -
 164
164 -
165
-
166
-
167
-
168
-
169
-
170
-
171
-
172
-
173
-
174
-
175
-
176
-
177
-
178
-
179
-
180
-
181
-
182
-
183
-
184
-
185
-
186
-
187
-
188
-
189
-
190
-
191
-
192
-
193
-
194
-
195
-
196
-
197
-
198
-
199
-
200
-
201
-
202
-
203
-
204
-
205
-
206
-
207
-
208
-
209
-
210
-
211
-
212
-
213
-
214
-
215
-
216
-
217
-
218
-
219
-
220
-
221
-
222
-
223
-
224
-
225
-
226
-
227
 |
 |
