Samsung UN55C7000WF User Manual (user Manual) (ver.1.0) (English, French, Span - Page 33
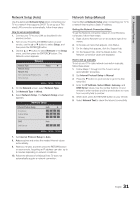
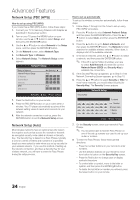
Network Setup Samsung Auto, Configuration, PBC WPS, SWL Samsung, Wireless Link
 |
View all Samsung UN55C7000WF manuals
Add to My Manuals
Save this manual to your list of manuals |
Page 33 highlights
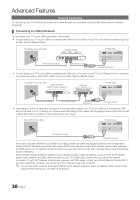
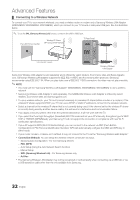
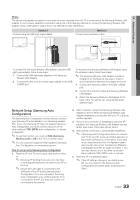
04 Advanced Features Notice The picture may appear corrupted or have static for some channels when the TV is connected to the Samsung Wireless LAN Adapter. In such a case, establish a connection using one of the following methods or connect the Samsung Wireless LAN Adapter using a USB cable in a place that is not affected by radio interference. Method 1 Connect using the USB right angle adapter Method 2 Connect via an extension cable or To connect the Samsung Wireless LAN Adapter using the USB right angle adapter, follow these steps: 1. Connect the USB right angle adapter to the Samsung Wireless LAN Adapter. 2. Connect the other end of the right angle adapter to the USB 1 (HDD) port. To reconnect the Samsung Wireless LAN Adapter using the extension cable, follow these steps: ✎✎The Samsung Wireless LAN Adapter should be installed in an interference-free area in order to avoid interference between the adapter and tuner. 1. Connect the extension cable to the USB 1 (HDD) port. 2. Connect the extension cable and Samsung Wireless LAN Adapter. 3. Attach the Samsung Wireless LAN Adapter to the back of the TV near the top, using double-sided adhesive tape. Network Setup (Samsung Auto Configuration) The Samsung Auto Configuration function lets you connect your Samsung TV automatically to non-Samsung wireless APs. If your non-Samsung AP does not support Samsung Auto Configuration, you must connect using one of the other methods: PBC (WPS), auto configuration, or manual configuration. ✎✎To use this function, you must set SWL (Samsung Wireless Link) to Off in the TV's on-screen menu. ✎✎You can check for equipment that supports Samsung Auto Configuration on www.samsung.com. How to set up using Samsung Auto Configuration 1. Place the AP and TV next to each other and turn them on. ✎✎ Because AP booting times vary, you may have to wait approximately two minutes for your AP to boot up. ✎✎ Ensure the LAN cable is connected to the WAN port of the AP during Samsung Auto Configuration. If it is not connected, Samsung Auto Configuration only confirms that the TV is connected to the AP, but does not confirm it is connected to the Internet. 2. After 2 minutes, connect the Samsung Wireless LAN Adapter to the TV. When the Samsung Wireless LAN Adapter establishes a connection with your TV, a pop-up window appears. 3. As soon as a connection is established, place the AP parallel to the Samsung Wireless LAN Adapter and not farther than 9 and 7/8s inches (25cm) from it. 4. Wait until the connection is automatically established. ✎✎ If Samsung Auto Configuration does not connect your TV to your AP, a pop-up window appears on the screen notifying you of the failure. If you want to try using Samsung Auto Configuration again, reset the AP, disconnect the Samsung Wireless LAN Adapter and then try again from Step 1. You can also choose one of the other connection setup methods: PBC (WPS), auto, or manual. 5. Place the AP in a desired location. ✎✎ If the AP settings change or you install a new AP, you must perform the Samsung Auto Configuration procedure again, beginning from Step 1. 33 English
-
 1
1 -
2
-
3
-
4
-
5
-
6
-
7
-
8
-
9
-
10
-
11
-
12
-
13
-
14
-
15
-
16
-
17
-
18
-
19
-
20
-
21
-
22
-
23
-
24
-
25
-
26
-
27
-
 28
28 -
 29
29 -
 30
30 -
 31
31 -
 32
32 -
 33
33 -
 34
34 -
 35
35 -
 36
36 -
 37
37 -
 38
38 -
39
-
40
-
41
-
42
-
43
-
44
-
45
-
46
-
47
-
48
-
49
-
50
-
51
-
52
-
53
-
54
-
55
-
56
-
57
-
58
-
59
-
60
-
61
-
62
-
63
-
64
-
65
-
66
-
67
-
68
-
69
-
70
-
71
-
72
-
73
-
74
-
75
-
76
-
77
-
78
-
79
-
80
-
81
-
82
-
83
-
84
-
85
-
86
-
87
-
88
-
89
-
90
-
91
-
92
-
93
-
94
-
95
-
96
-
97
-
98
-
99
-
100
-
101
-
102
-
103
-
104
-
105
-
106
-
107
-
108
-
109
-
110
-
111
-
112
-
113
-
114
-
115
-
116
-
117
-
118
-
119
-
120
-
121
-
122
-
123
-
124
-
125
-
126
-
127
-
128
-
129
-
130
-
131
-
132
-
133
-
134
-
135
-
136
-
137
-
138
-
139
-
140
-
141
-
142
-
143
-
144
-
145
-
146
-
147
-
148
-
149
-
150
-
151
-
152
-
153
-
154
-
155
-
156
-
157
-
158
-
159
-
160
-
161
-
162
-
163
-
164
-
165
-
166
-
167
-
168
-
169
-
170
-
171
-
172
-
173
-
174
-
175
-
176
-
177
-
178
-
179
-
180
-
181
-
182
-
183
-
184
-
185
-
186
-
187
-
188
-
189
-
190
-
191
-
192
-
193
-
194
-
195
-
196
-
197
-
198
-
199
-
200
 |
 |