Sanyo CE32LD81 Instruction Manual - Page 16
Analogue TV Menu System - b resolution
 |
View all Sanyo CE32LD81 manuals
Add to My Manuals
Save this manual to your list of manuals |
Page 16 highlights
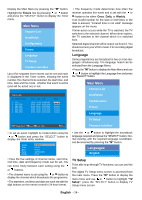
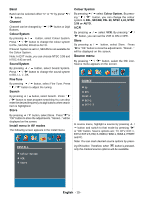
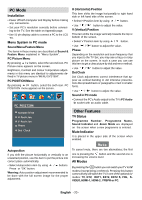
Main Menu Channel List Installation Configuration Timers Language TV Setup Common Interface Detailed information about Sound, Picture and Feature menus are in AnalogueTV Menu System section on page 19. Common Interface • Press the "M" button to display the Main Menu and use the or button to highlight the "Common Interface" line and press the "SELECT" button. Main Menu Channel List Installation Configuration 3. Connect the TV to the mains supply, switch on and then wait for few moments until the card is activated. • Some CAMs may require the following set up. Please set the CAM by entering the IDTV menu, Common Interface then pressing the "SELECT" button. (CAM set up menu is not displayed when it is not required.) • To see the viewing contract information: Enter IDTV; press the "M" button, then highlight Common Interface and press the "SELECT" button. • When no module is inserted, "No Common Inter- face module detected" message appears on the screen. • Refer to the module instruction manual for details of the settings. Analogue TV Menu System Picture Menu PICTURE Mode Contrast Brightness Sharpness Colour Timers Language TV Setup Common Interface In picture menu if PC,YPbPr or HDMI modes are selected, resolution information is displayed at the bottom of the menu osd. It is required to subscribe to a pay channel company to view the pay channels of the Digital Terrestrial broadcasting. Obtain the Conditional Access Module (CAM) and the Viewing card by subscribing to a pay channel company, then insert those to the Television using the following procedure. 1. Switch off the TV and unplug from the mains. 2. Insert the CAM, then Viewing Card to the slot that is located in the terminal cover at the left-hand side of the TV (from front view). • The CAM should be correctly inserted, it is impossible to insert fully if reversed. The CAM or the TV terminal may be damaged if the CAM is forcefully inserted. Mode By pressing / button, select Mode. Press / button to choose from one of these options: Cinema, Dynamic and Natural. Contrast/Brightness/Sharpness/Colour/Hue By pressing / button, select the desired Option. Press / button to set the level. Hint: Hue is displayed in picture menu when the TV receives an NTSC signal. Colour Temp • By pressing / button select Colour Temp. • Press / to choose from one of these options: Cool, Normal and Warm. English - 15 -
-
 1
1 -
2
-
3
-
4
-
5
-
6
-
7
-
8
-
9
-
10
-
 11
11 -
 12
12 -
 13
13 -
 14
14 -
 15
15 -
 16
16 -
 17
17 -
 18
18 -
 19
19 -
 20
20 -
 21
21 -
22
-
23
-
24
-
25
-
26
-
27
-
28
-
29
-
30
 |
 |