Sanyo EF60 Instruction Manual, PLC-EF60 - Page 11
Top Control
 |
View all Sanyo EF60 manuals
Add to My Manuals
Save this manual to your list of manuals |
Page 11 highlights
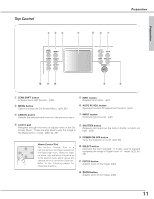
Preparation Top Control q we r t yu LENS SHIFT MENU ZOOM CANCEL FOCUS SELECT AUTO PC ADJ. INPUT INFO. SHUTTER POWER P Preparation !2 !1 !0 o i q LENS SHIFT button Activates Lens shift function. (p30) w MENU button Opens or closes the On-Screen Menu. (p34, 35 ) t INFO. button Displays Information. (p31) y AUTO PC ADJ. button Operates the Auto PC adjustment function. (p31) e CANCEL button u INPUT button Cancels the selection and returns to the previous menu. Switches input sources. (p31) r Control pad Navigates through the menu or adjusts value in the OnScreen Menu. These are also used to pan the image in the Digital zoom + mode. (p33, 34, 35) About Control Pad The built-in Control Pad is a semiconductive touchpad operational with light finger touch. Glide your finger up, down, right and left on the pad to go to the desired menu, adjust values and operate various convenient features. Refer to the following pages for respective directions. i SHUTTER button Releases and opens up the built-in shutter to block out light. (p30) o POWER ON-OFF button Turns the projector on or off. (p28, 29) !0 SELECT button Executes the item selected. It is also used to expand/ compress the image in Digital zoom +/- mode. (p33, 34, 35) !1 FOCUS button Adjusts focus of the image. (p30) !2 ZOOM button Adjusts zoom of the image. (p30) 11
-
 1
1 -
2
-
3
-
4
-
5
-
 6
6 -
 7
7 -
 8
8 -
 9
9 -
 10
10 -
 11
11 -
 12
12 -
 13
13 -
 14
14 -
 15
15 -
 16
16 -
17
-
18
-
19
-
20
-
21
-
22
-
23
-
24
-
25
-
26
-
27
-
28
-
29
-
30
-
31
-
32
-
33
-
34
-
35
-
36
-
37
-
38
-
39
-
40
-
41
-
42
-
43
-
44
-
45
-
46
-
47
-
48
-
49
-
50
-
51
-
52
-
53
-
54
-
55
-
56
-
57
-
58
-
59
-
60
-
61
-
62
-
63
-
64
-
65
-
66
-
67
-
68
-
69
-
70
-
71
-
72
-
73
-
74
-
75
-
76
-
77
-
78
-
79
-
80
-
81
-
82
-
83
-
84
 |
 |
