Sanyo EF60 Instruction Manual, PLC-EF60 - Page 13
INPUT 4 WARP & BLENDING board, INPUT 5 Vacant for Optional Interface Board
 |
View all Sanyo EF60 manuals
Add to My Manuals
Save this manual to your list of manuals |
Page 13 highlights
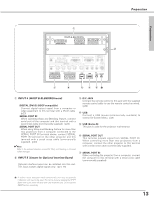
Preparation Preparation q w u y t r e✽ q INPUT 4 (WARP & BLENDING board) DIGITAL (DVI-D) (HDCP compatible) Connect digital output signal from a computer or video equipment to this terminal with a DVI-D cable. (p23) SERIAL PORT IN When operating Warp and Blending feature, connect serial port of the computer and this terminal with a serial cross cable (commercially supplied). (p23) SERIAL PORT OUT When using Warp and Blending feature for more than two projectors from a computer connected to the SERIAL PORT IN terminal above, connect SERIAL PORT IN terminal on the other projector and this terminal with a serial cross cable (commercially supplied). (p23) ✔Note: Refer to the enclosed operation manual for Warp and Blending in Advanced Screen Manager. w INPUT 5 (Vacant for Optional Interface Board) Optional interface board can be installed into this slot. This input accepts digital signals only. (p21, 75) e R/C JACK Connect the remote control to this jack with the supplied remote control cable to use the remote control as wired. (p26) r USB Connect a USB mouse (commercially available) to control On-Screen Menu. (p26) t USB (Series B) This port is used for the projector maintenance. y SERIAL PORT OUT This terminal outputs signal from SERIAL PORT IN. When controling more than two projectors from a computer, connect the other projector to this terminal with a serial cross cable (commercially supplied). u SERIAL PORT IN When controling the projector from a computer, connect the computer to this terminal with a serial cross cable (commercially supplied). ✽ A built-in micro processor which controls this unit may occasionally malfunction and need to be reset. This can be done by pressing the RESET button with a pen, which will shut down and restart the unit. Do not use the RESET function excessively. 13
-
 1
1 -
2
-
3
-
4
-
5
-
6
-
7
-
 8
8 -
 9
9 -
 10
10 -
 11
11 -
 12
12 -
 13
13 -
 14
14 -
 15
15 -
 16
16 -
 17
17 -
 18
18 -
19
-
20
-
21
-
22
-
23
-
24
-
25
-
26
-
27
-
28
-
29
-
30
-
31
-
32
-
33
-
34
-
35
-
36
-
37
-
38
-
39
-
40
-
41
-
42
-
43
-
44
-
45
-
46
-
47
-
48
-
49
-
50
-
51
-
52
-
53
-
54
-
55
-
56
-
57
-
58
-
59
-
60
-
61
-
62
-
63
-
64
-
65
-
66
-
67
-
68
-
69
-
70
-
71
-
72
-
73
-
74
-
75
-
76
-
77
-
78
-
79
-
80
-
81
-
82
-
83
-
84
 |
 |
