Sanyo HD150 Owners Manual - Page 18
Operation Of Remote Control
 |
View all Sanyo HD150 manuals
Add to My Manuals
Save this manual to your list of manuals |
Page 18 highlights
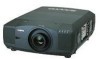
BEFORE OPERATION OPERATION OF REMOTE CONTROL q !1 w e ON-OFF r !2 ZOOM t !3 y !4 FOCUS u !5 !6 i SELECT o !0 !7 !8 RESET !9 q SELECT button Executes the item selected. (P20) w SIGNAL EMISSION indicator This indicator lights red while a signal is being sent from the remote control to the projector. e SCREEN button Select image screen. (P28) r ZOOM button Adjust zoom. (P23) t FREEZE button Freezes the projected picture. (P23) y MUTE button Mutes sound. (P24) u FOCUS button Adjust focus. (P23) i POINT (UP/DOWN/LEFT/RIGHT) button Selects an item or adjusts value in the On-Screen Menu. (P20) Point Left/Right button are also used as VOLUME +/- button. (P24) o SELECT button Executes the item selected. (P20) !0 IMAGE (1-10) buttons Selects image levels (IMAGE 1 - IMAGE 10). (P32) !1 WIRED REMOTE JACK When using as Wired Remote Control, connect Remote Control Cable to this jack. Battery installation is required when using as Wired Remote Control. !2 POWER ON-OFF button Turns the projector on or off. (P22) !3 AUTO PC button Operates the Auto PC adjustment function. (P29) !4 NO SHOW button Turns the picture into black image. (P23) !5 MENU button Opens or closes the On-Screen Menu. (P20) !6 LENS SHIFT button Select LENS SHIFT function. (P23) !7 INPUT 1-4 buttons Select input source (INPUT 1-INPUT 4). (P25) !8 IMAGE button Selects image levels. (P32) !9 RESET switch Slide this switch to the "RESET" to initialize the remote control code. (P19, 39) 18
-
 1
1 -
2
-
3
-
4
-
5
-
6
-
7
-
8
-
9
-
10
-
11
-
12
-
 13
13 -
 14
14 -
 15
15 -
 16
16 -
 17
17 -
 18
18 -
 19
19 -
 20
20 -
 21
21 -
 22
22 -
 23
23 -
24
-
25
-
26
-
27
-
28
-
29
-
30
-
31
-
32
-
33
-
34
-
35
-
36
-
37
-
38
-
39
-
40
-
41
-
42
-
43
-
44
-
45
-
46
-
47
-
48
-
49
-
50
-
51
-
52
-
53
-
54
 |
 |
