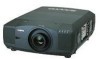
Sanyo HD150 Owners Manual - Page 41
Appendix
 |
View all Sanyo HD150 manuals
Add to My Manuals
Save this manual to your list of manuals |
Page 41 highlights
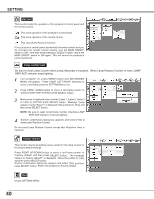
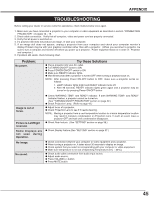
APPENDIX MAINTENANCE WARNING TEMP. INDICATOR The Warning Temp. Indicator flashes red to let you know the internal temperature of the projector exceeds the normal level. If the temperature goes up further, the projector will be turned off automatically and the Ready indicator will go out. (The Warning Temp. Indicator continues flashing.) After the cooling-off period, the Ready Indicator lights on again and the projector can be turned on by pressing the On/Off button on the remote control unit or on the side control. When you turn on the projector, the Warning Temp. Indicator will go out. If the Warning Temp. Indicator is still flashing, check the followings; 1 Ventilation Slots of a projector may be blocked. In such an event, reposition a projector so that Ventilation Slots are not obstructed. 2 Air Filter may be clogged with dust particles. Clean Air Filter by following section AIR FILTER CARE AND CLEANING on this page. FRONT INDICATORS READY WARNING LAMP TEMP. REPLACE LAMP Warning Temp. Indicator Ready Indicator LAMP READY RWELTAPAERLMMANPPCIN.EG 3 If WARNING TEMP. Indicator remains on after performing above checks, Cooling Fans or Internal Circuits may be malfunctioning. Contact the service station. When both of the Warning Temp. and Ready indicators are flashing: REAR INDICATORS When the projector detects an internal problem, it will shut down automatically and both of the Warning temp. and Ready Indicators starts flashing. In this condition, the projector cannot be turned on even if you press the On/Off button on the remote control unit or on the side control. If this case happenes, disconnect and reconnect the AC power cord, and then turn on the projector again to check its operation. If the projector shuts down again or fails to be turned on, the internal check and repair will be required. Plug off the AC power cord and contact service station. AIR FILTER CARE AND CLEANING Air Filter prevents dust from accumulating on surface of Projection Lens and Projection Mirror. Should Air Filter become clogged with dust particles, it will reduce Cooling Fans' effectiveness and may result in internal heat build up and adversely affect life of a projector. Clean Air Filter following steps below: 1 Turn power off, and disconnect AC power cord from AC outlet. 2 Pull out air filter from a projector. 3 Pulling up center frame of air filter top, separate air filter top and sheet from air filter base. 4 Clean each parts with brush or wash out dust and particles. Be sure to dry them out. AIR FILTER 5 Assemble sheet and air filter and replace air filter to a projector. AIR FILTER TOP CAUTION Do not operate a projector with Air Filter removed. Dust may accumulate on LCD Panel and Mirror degrading picture quality. Do not put small parts into Air Intake Vents. It may result in malfunction of a projector. AIR FILTER BASE SHEET RECOMMENDATION We recommend avoiding dusty/smoky environments when operating a projector. Usage in these environments may cause poor image quality. When using under dusty or smoky conditions, dust may accumulate on liquid crystal panel, lens, or optical elements inside it. This condition may degrade quality of projected image. When above symptoms are noticed, contact your authorized dealer or service station for proper cleaning. 41
-
 1
1 -
2
-
3
-
4
-
5
-
6
-
7
-
8
-
9
-
10
-
11
-
12
-
13
-
14
-
15
-
16
-
17
-
18
-
19
-
20
-
21
-
22
-
23
-
24
-
25
-
26
-
27
-
28
-
29
-
30
-
31
-
32
-
33
-
34
-
35
-
 36
36 -
 37
37 -
 38
38 -
 39
39 -
 40
40 -
 41
41 -
 42
42 -
 43
43 -
 44
44 -
 45
45 -
 46
46 -
47
-
48
-
49
-
50
-
51
-
52
-
53
-
54
 |
 |
