Sanyo PLC-XP200L Instruction Manual, PLC-XP200L - Page 14
Remote Control, WIRED REMOTE jack
 |
UPC - 086483072208
View all Sanyo PLC-XP200L manuals
Add to My Manuals
Save this manual to your list of manuals |
Page 14 highlights
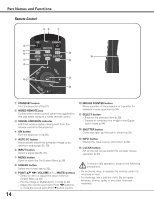
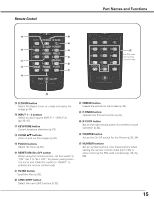
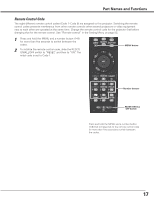
Part Names and Functions Remote Control ew q r t y !3 !4 u !2 i o !1 !0 q STAND-BY button Turn the projector off (p.27). w Wired Remote jack Connect the remote control cable (not supplied) to this jack when using as a wired remote control. e Signal Emission indicator Light red while a signal is being sent from the remote control to the projector. r ON button Turn the projector on (p.26). t AUTO PC button Automatically adjust the computer image to its optimum setting (pp.32, 39). y INPUT button Select a signal (pp.35-37). u MENU button Open or close the On-Screen Menu (p.28). i SCREEN button Select the screen size (p.32). o Point ed 7 8 ( VOLUME + / - , MUTE) buttons - Select an item or adjust the value in the OnScreen Menu (p.28). - Pan the image in Digital zoom + mode (p.44). - Adjust the volume level (with Point 7 8 buttons) or mute the sound (with Point d button.) (p.31). 14 !0 MOUSE POINTER button Move a pointer of the projector or a pointer for wireless mouse operation (p.34). !1 SELECT button - Execute the selected item (p.28). - Expand or compress the image in the Digital zoom mode (p.44). !2 SHUTTER button Close and open up the built-in shutter (p.30). !3 INFO. button Display the input source information (p.32). !4 L-Click button Act as the left mouse button for wireless mouse operation (p.34). To ensure safe operation, observe the following precautions: - Do not bend, drop, or expose the remote control to moisture or heat. - For cleaning, use a soft dry cloth. Do not apply benzene, thinner, splay, or any other chemical materials.
-
 1
1 -
2
-
3
-
4
-
5
-
6
-
7
-
8
-
 9
9 -
 10
10 -
 11
11 -
 12
12 -
 13
13 -
 14
14 -
 15
15 -
 16
16 -
 17
17 -
 18
18 -
 19
19 -
20
-
21
-
22
-
23
-
24
-
25
-
26
-
27
-
28
-
29
-
30
-
31
-
32
-
33
-
34
-
35
-
36
-
37
-
38
-
39
-
40
-
41
-
42
-
43
-
44
-
45
-
46
-
47
-
48
-
49
-
50
-
51
-
52
-
53
-
54
-
55
-
56
-
57
-
58
-
59
-
60
-
61
-
62
-
63
-
64
-
65
-
66
-
67
-
68
-
69
-
70
-
71
-
72
-
73
-
74
-
75
-
76
-
77
-
78
-
79
-
80
-
81
-
82
-
83
-
84
-
85
-
86
-
87
-
88
 |
 |
