Sanyo mpr-214f Instruction Manual - Page 11
Leveling feet
 |
View all Sanyo mpr-214f manuals
Add to My Manuals
Save this manual to your list of manuals |
Page 11 highlights
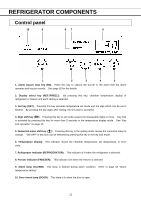
REFRIGERATOR COMPONENTS 1. Glass window: Water can sometimes condense on the glass in areas of high humidity. Wipe off the condensation with a dry soft cloth. 2. Magnetic door gasket: This prevents the cool air from escaping. Always keep clean. 3. Control panel: The operation status is displayed on this panel. And the temperature setting is available through this panel. Refer to page 11 for the details. 4. Mounting space for temperature recorder: Space for an automatic temperature recorder available separately. See page 22 for the mounting of the recorder. 5. Lamp: This lamp lights up when the refrigerator door is open to illuminate the chamber. 6. Air intake vent: Ensure this vent is never blocked. Failure to do so will result in unstable temperature distribution in the refrigerator. 7. Circulating fan: This is for cooling the refrigerator uniformly. Fan is installed inside the enclosure. Do not insert anything into the enclosure. The air exhaust vent is located at the upper of the fan. 8. Lock: Turn key clockwise through 180 degree to lock the door. The right side lock is for the right upper and lower doors and left side lock is for the left upper and lower doors. 9. Access port: This port allows cables to be passed into the cabinet. 10. Remote alarm terminal (rear): This is used to alarm the abnormality to the remote location. See page 19 for the details. 11. Leveling feet: Use these bolts to adjust the height and level the unit for installation. 12. Cool air exhaust vent: Ensure this vent is never blocked. Note the items exposed to the direct air flow can be frozen. 13. Shelf (for refrigerator): Place the material on the shelves. Always put the material on the protective sheet when they are placed on the refrigerator floor. 14. Protective sheet: The stored material may be frozen if it is put on the refrigerator bottom directly. Always put the sheet in the refrigerator compartment. 15. Shelf (for freezer): Place the material on the shelf. Do not touch any stored material with a wet hand. This may cause frostbite. 16. Drain port for defrosted water: For draining the defrosted water in the chamber after defrosting. Remove the cap to drain the water. 10
-
 1
1 -
2
-
3
-
4
-
5
-
 6
6 -
 7
7 -
 8
8 -
 9
9 -
 10
10 -
 11
11 -
 12
12 -
 13
13 -
 14
14 -
 15
15 -
 16
16 -
17
-
18
-
19
-
20
-
21
-
22
-
23
-
24
-
25
-
26
-
27
-
28
-
29
-
30
-
31
-
32
-
33
-
34
-
35
 |
 |
