Seagate Maxtor Fusion Installation Guide - Page 10
Configuring a Hostname, SMTP Server Name, Port Number, Finish - personal web server
 |
View all Seagate Maxtor Fusion manuals
Add to My Manuals
Save this manual to your list of manuals |
Page 10 highlights
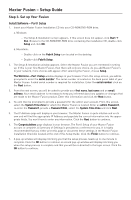
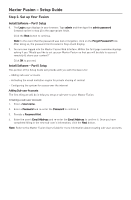
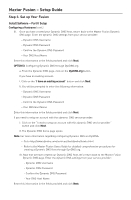
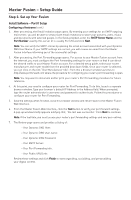
Maxtor Fusion - Setup Guide Step 3. Set up Your Fusion Install Software - Part II Setup Configuring a Hostname (cont.) 2. After processing, the Email Invitation page opens. By entering your settings for an SMTP outgoing mail server, you will be able to send private email invitations to share your pictures, video, music and documents with selected guests. In the fields provided, enter the SMTP Server Name and the Port Number used by this server (it is usually Port 25) and click Next. Note: You can verify the SMTP entries by opening the email account associated with your Dynamic DNS User Name. If your SMTP settings are correct, you will receive an email from the Maxtor Fusion interface informing you of the successful settings. 3. After processing, the Port Forwarding page opens. For access to your Maxtor Fusion account from the Internet, you must configure the Port Forwarding settings for your router so that it can direct the desired traffic to your Maxtor Fusion account. For a detailed setup guide, select your router manufacturer and router model from the provided drop down fields. Once your router is selected, you can click on the link "Visit Manufacturer Site"; from this a browser window launches to http://www.portforward.com where the procedure for configuring you router's port forwarding is open. Note: You may want to document and/or print your router's Port Forwarding procedure for future reference. 4. At this point, you need to configure your router for Port Forwarding. To do this, launch a separate browser window. Type your browser's default IP Address in the Address field. When prompted, type the router administrator's username and password to authenticate. Follow the procedures to configure your router for Port Forwarding. 5. Save the settings when finished, close this browser window and return back to the Maxtor Fusion Web Interface. 6. From the Maxtor Fusion Web Interface, click the Test button to verify your port forward settings. A pop-up window briefly appears notifying that, "the test was successful." Click Next to continue. Note: If the test fails, you must access your router's port forwarding settings and very your entries. 7. The Review page opens and provides a listing of: - Your Dynamic DNS Host: - Your Dynamic DNS User name: - Your Dynamic DNS Password: - Your SMTP Server: - Your Port Forwarding info: - Your Public URL/Link: Review these settings and click Finish to start organizing, socializing, and personalizing your digital content.
-
 1
1 -
2
-
3
-
4
-
 5
5 -
 6
6 -
 7
7 -
 8
8 -
 9
9 -
 10
10 -
 11
11 -
 12
12 -
 13
13 -
 14
14
 |
 |