Sennheiser TeamConnect Ceiling 2 Configuration of 802.1X for TeamConnect Ceili - Page 10
AN 1258 v1.0 | 10/12, issuer= /C=FR/ST=Radius/L=Somewhere/O=Example
 |
View all Sennheiser TeamConnect Ceiling 2 manuals
Add to My Manuals
Save this manual to your list of manuals |
Page 10 highlights
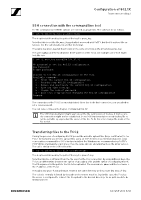
Configuration of 802.1X TeamConnect Ceiling 2 An example configuration might look like this. Please enter your identity: [email protected] Now upload a Certificate Authority (CA) list. After successful upload enter the filename here. Filename: ca.pem Verifying Certificate Authority (CA) list... issuer= /C=FR/ST=Radius/L=Somewhere/O=Example Inc./[email protected]/CN=Example Certificate Authority Certificate Authority (CA) list is valid! Now upload your client certificate. After successful upload enter the filename here. Filename: client.pem Verifying client certificate... /home/pnac/tmp/client.pem: OK Client certificate is valid! Now upload your private key file. After successful upload enter the filename here. Filename: client.key Is the key file password protected? [Y/n]: Please enter the password for the key. Password: Retype password: Verifying key file... RSA key ok Key file is valid! 802.1X successfully configured with „EAP-TLS" for user [email protected]. The new configuration will be activated after a reboot. Sometimes the private key and the client certificate are combined in a single file. If that is the case, just upload that file once when asked for the client certificate and reuse the same filename in the step asking for the client key. AN 1258 v1.0 | 10/12
-
 1
1 -
2
-
3
-
4
-
 5
5 -
 6
6 -
 7
7 -
 8
8 -
 9
9 -
 10
10 -
 11
11 -
 12
12
 |
 |
