Sennheiser TeamConnect Ceiling 2 Configuration of 802.1X for TeamConnect Ceili - Page 9
Setting the system time, Step-by-step configuration, EAP-TLS
 |
View all Sennheiser TeamConnect Ceiling 2 manuals
Add to My Manuals
Save this manual to your list of manuals |
Page 9 highlights
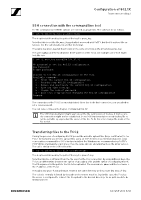
Configuration of 802.1X TeamConnect Ceiling 2 Setting the system time Certificates have a validity period. Therefore, it is crucial for the TCC2 to have a correct system time. The TCC2 is equipped with a buffered RTC (real time clock), so the time will also be valid even if the TCC2 is not powered for a few days. With the d command you can set the system time. We highly recommend checking the system time as the first step of the configuration to make sure this will not lead to a problem later in the process. Current date and time is: Tue Jul 9 06:06:44 UTC 2019 Do you want to change the date and time? [Y/n]: y Year (e.g. 2019): 2019 Month (1-12): 11 Day (1-31): 1 Hour (0-23): 12 Minute (0-59): 34 Current date and time is: Fri Nov 1 12:34:00 UTC 2019 Step-by-step configuration The step-by-step configuration will guide you through the setup of 802.1X. The TCC2 supports two authentication methods: EAP-TLS and EAP-PEAPv0/EAP-MSCHAPv2. EAP-TLS For the EAP-TLS authentication method network clients need a client certificate and private key as well as a certificate authority list with trusted certificates which has signed the client certificate. These files must be prepared using a PKI (public key infrastructure). The TCC2 supports certificates as per X.509 standard. PFX or PKCS#12 are currently not supported and must be converted before using them with the TCC2. Welcome to the 802.1X configuration of the TCC2! Available commands: p - Prints the current 802.1X configuration. c - Step-by-step 802.1X configuration. r - Removes and deactivates the current 802.1X configuration. d - Set date and time. w - Change the current password. q - Quits this setup without changing the 802.1X configuration. Command: c Please choose the authentication method. Possible settings are: 1 - EAP-TLS 2 - EAP-PEAP (PEAPv0/EAP-MSCHAPv2) Method: 1 After choosing EAP-TLS as the authentication method you will be asked for the following information: 1. Username / identity of the client 2. Certificate authority list (file) 3. Client certificate (file) 4. Client private key (file) AN 1258 v1.0 | 9/12
-
 1
1 -
2
-
3
-
 4
4 -
 5
5 -
 6
6 -
 7
7 -
 8
8 -
 9
9 -
 10
10 -
 11
11 -
 12
12
 |
 |
