Sennheiser TeamConnect Ceiling 2 Configuration of 802.1X for TeamConnect Ceili - Page 7
Example, AN 1258 v1.0 | 7/12
 |
View all Sennheiser TeamConnect Ceiling 2 manuals
Add to My Manuals
Save this manual to your list of manuals |
Page 7 highlights
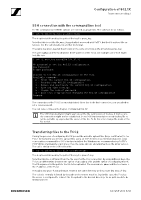
Configuration of 802.1X TeamConnect Ceiling 2 PuTTY PSCP tool understands the same options and arguments, but the option -scp is needed. $ pscp.exe -scp -i identity_file file user@hostname: Since PuTTY PSCP also uses another key file format the -i option needs to be followed by the path of the key file pnac-ft_key.ppk. Example During configuration you are asked to upload a certificate authority list. Now upload a Certificate Authority (CA) list. After successful upload enter the filename here. Filename: _ To provide this file on the TCC2 use a separate window or terminal for the file upload and keep the SSH session open. A successful file upload by SCP for the file might look like this. $ scp -i pnac-ft_key ca.pem [email protected]: Sink: C0644 1757 ca.pem 100% 1757 ca.pem 604.0KB/s 00:00 Afterwards, in the SSH session enter the filename of the file just uploaded and hit enter. Now upload a Certificate Authority (CA) list. After successful upload enter the filename here. Filename: ca.pem AN 1258 v1.0 | 7/12
-
 1
1 -
 2
2 -
 3
3 -
 4
4 -
 5
5 -
 6
6 -
 7
7 -
 8
8 -
 9
9 -
 10
10 -
 11
11 -
 12
12
 |
 |
