Sennheiser TeamConnect Ceiling 2 Configuration of 802.1X for TeamConnect Ceili - Page 6
SSH connection with the command line tool, Transferring files to the TCC2, AN 1258 v1.0 | 6/12 - setup
 |
View all Sennheiser TeamConnect Ceiling 2 manuals
Add to My Manuals
Save this manual to your list of manuals |
Page 6 highlights
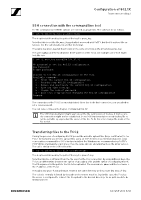
Configuration of 802.1X TeamConnect Ceiling 2 SSH connection with the command line tool For the command line SSH the options are entered as arguments. The call must be as follows. $ ssh -i identity_file user@hostname The -i option is followed by the path of the key file pnac_key. Note that this is not the file pnac_key.ppk which was used with PuTTY, but the file without file extension. It is the same key but in another file format. The public key pnac_key.pub must reside in the same directory as the private key pnac_key. The user is pnac and the hostname is the IP address of the TCC2. An example call of SSH might look like this: $ ssh -i pnac_key [email protected] No password is set for 802.1X configuration. New Password: Retype password: Welcome to the 802.1X configuration of the TCC2! Available commands: p - Print the current 802.1X configuration c - Step-by-step 802.1X configuration r - Remove and deactivate the current 802.1X configuration d - Date and time settings w - Change the current password q - Quit this setup without changing the 802.1X configuration Command: The connection to the TCC2 is now established. Since this is the first connection, you are asked to set a new password. You can now continue with chapter „Configuring 802.1X". The SSH implementation might warn about the file permissions of the key. If that occurs, the connection might not be established. Some SSH implementations need the key file to not be writable by anyone but the owner of the file. To fix this error change the mode of the file to 600. Transferring files to the TCC2 During the process of configuring 802.1X you will be asked to upload files (keys, certificates) to the TCC2. At that point you need to upload files using an SCP client tool (as mentioned above). Linux comes with a command line SCP client preinstalled. For Windows we recommend using PuTTY's PSCP (https://www.putty.org/) since it has the same options and arguments as the Linux version. The call is similar to the SSH call earlier. $ scp -i identity_file file user@hostname: The -i option is followed by the path of the key file pnac-ft_key. Note that this file is different from the file used for the SSH connection. By using different keys, the TCC2 can differentiate between the option of uploading a file and the option of configuring 802.1X. The file argument is the path to the file to be uploaded. The username is pnac and the hostname is the IP address of the TCC2. The public key pnac-ft_key.pub must reside in the same directory as the private key pnac_ft-key. The colon is normally followed by the path on the remote machine. But in this case, the TCC2 as the server is configured to redirect the file upload to the desired directory. So no path needs to be mentioned here AN 1258 v1.0 | 6/12
-
 1
1 -
 2
2 -
 3
3 -
 4
4 -
 5
5 -
 6
6 -
 7
7 -
 8
8 -
 9
9 -
 10
10 -
 11
11 -
 12
12
 |
 |
