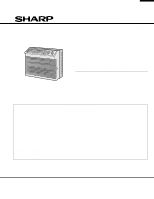
Sharp AF-05CML Service Manual - Page 5
Installation Installations
 |
View all Sharp AF-05CML manuals
Add to My Manuals
Save this manual to your list of manuals |
Page 5 highlights
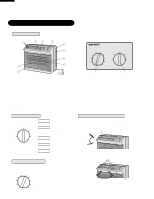
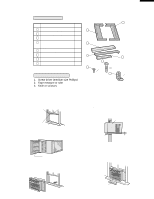
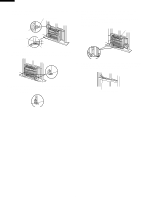
AF-05CML INSTALLATION INSTALLATIONS ACCESSORIES No. Accessories Q'ty 1 Right closure assembly 2 Left closure assembly 1 2 1 3 Window sash foam seal 1 4 Window sash foam seal 1 3 (adhesive type) 5 Bottom gasket 1 6 Screws(L=1",25.4mm) 7 Screws(L=13/32",10mm) 7 4 6 8 Base pan angle 2 7 SUGGESTED TOOLS 1. Screw driver (medium size Phillips) 2. Tape measure or ruler 3. Knife or scissors 1 6 7 6 8 5 2 INSTALLATION WARNING: Make sure the unit is turned off and unplugged before working. 1. Cut the window sash foam seal (adhesive type) to the proper length and attach it to the underside of the window sash. Jamb Sash WARNING: At this step, make sure the unit is inclinedapproximately 1 cm (3/8") to the back. If the unit is not properly inclined, the water collected in the bottom tray during operation will not drain properly and may flow into the room where the air conditioner is installed. Window sash foam seal (adhesive type) Sill 2. Insert the right closure assembly and the left closure assembly into the top angle and the bottom channels. Secure the right and left closure to the cabinet with six of the provided screws. (L= 13/32",10mm) Unit Sill incline backwards about 1cm (3/8") Closure assembly 3. Open the window sash and place the air conditioner on the sill. Balance the unit on the sill and close the window sash securely behind the top angle. 4. Insert the bottom gasket into the space between the window sill and the bottom of the unit to seal outside air. If there is space between the bottom channel and the sill, fill the gap with a thin board or other hard filler. Bottom gasket 5
-
 1
1 -
 2
2 -
 3
3 -
 4
4 -
 5
5 -
 6
6 -
 7
7 -
 8
8 -
 9
9 -
 10
10 -
 11
11 -
12
-
13
-
14
-
15
-
16
-
17
-
18
-
19
-
20
-
21
-
22
-
23
-
24
 |
 |
