Sharp AF-05CML Service Manual - Page 8
screws are holding the bulkhead to the base pan
 |
View all Sharp AF-05CML manuals
Add to My Manuals
Save this manual to your list of manuals |
Page 8 highlights
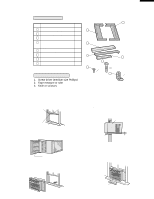
AF-05CML 9. Unfasten the one nut at the top of the compressor holding the terminal cover. Then remove the wiring connector of the compressor cord. 13. Unscrew the 5 screws. 2 screws are holding the evaporator on each side. 3 screws are holding the bulkhead to the base pan on each side and back side. 10. Unscrew the 6 screws holding the condenser. 2 screws are on right side. 2 screws are on left side. 2 screws are on back side. And remove the condenser from the unit. 14. Lift up and take out the bulkhead. 15. Unscrew the 2 screws holding the orifice. 11. Unfasten the nut holding the propeller fan by rotating it counter-clockise. And remove the propeller fan. 16. Unscrew the screw holding the centrifugal fan. (Remove by using a driver or a wrench) 12. Unscrew the 3 screws holding the condenser shround. And remove the condenser shround. 8
-
 1
1 -
2
-
 3
3 -
 4
4 -
 5
5 -
 6
6 -
 7
7 -
 8
8 -
 9
9 -
 10
10 -
 11
11 -
 12
12 -
 13
13 -
14
-
15
-
16
-
17
-
18
-
19
-
20
-
21
-
22
-
23
-
24
 |
 |
