Sharp AR-F14 AR-F14 Saddle-Stitch Finisher Operation Manual - Page 11
Removing a staple jam
 |
View all Sharp AR-F14 manuals
Add to My Manuals
Save this manual to your list of manuals |
Page 11 highlights
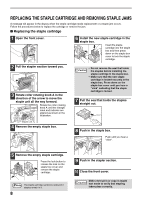
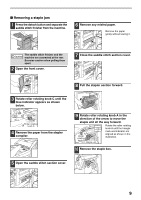
I Removing a staple jam 1 Press the detach button and separate the saddle stitch finisher from the machine. 6 Remove any misfed paper. Remove the paper gently without tearing it. Caution The saddle stitch finisher and the machine are connected at the rear. Exercise caution when pulling them apart. 2 Open the front cover. 7 Close the saddle stitch section cover. 8 Pull the stapler section forward. 3 Rotate roller rotating knob C until the blue indicator appears as shown below. Blue Roller rotating knob C 4 Remove the paper from the stapler compiler. 9 Rotate roller rotating knob A in the direction of the arrow to move the staple unit all the way forward. Rotate the roller rotating knob A until the triangle mark and indicator are Roller rotating knob A Staple unit aligned as shown in the illustration. 10 Remove the staple box. 5 Open the saddle stitch section cover. 9
-
 1
1 -
2
-
3
-
4
-
5
-
 6
6 -
 7
7 -
 8
8 -
 9
9 -
 10
10 -
 11
11 -
 12
12 -
 13
13 -
 14
14 -
 15
15 -
 16
16 -
17
-
18
 |
 |
